Sitecore XM Cloud Developer Certification Preparation Notes
Passed the Sitecore XM cloud developer certification exam.

Here is SEO-friendly preparation material for the wider community -
Disclaimer:


|
Competency |
No.
of questions |
|
1 XM Cloud Architecture and Developer
Workflow |
6 |
|
2 Deployment
of XM Cloud Projects |
8 |
|
3 Renderings
and Layouts |
7 |
|
4 Sitecore
Content Serialization |
7 |
|
5 Sitecore
APIs and Webhooks |
5 |
|
6 XM
Cloud Pages (aka) Sitecore Pages |
5 |
|
7 Security
for Developers |
5 |
|
8 Data
Modeling |
7 |
|
Total |
50 |
- Define
Sitecore XM Cloud-specific terminology
- Describe
the benefits of cloud and SaaS architecture for composable DXP foundations
- Define
key components within the developer workflow for XM Cloud
- Manage
sites within site collections
Resources:
XM
Cloud terminology(opens in a new tab)
Sitecore-first
development workflow(opens in a new tab)
Code-first
development workflow(opens in a new tab)
Site
collections(opens in a new tab)
Why XM Cloud?
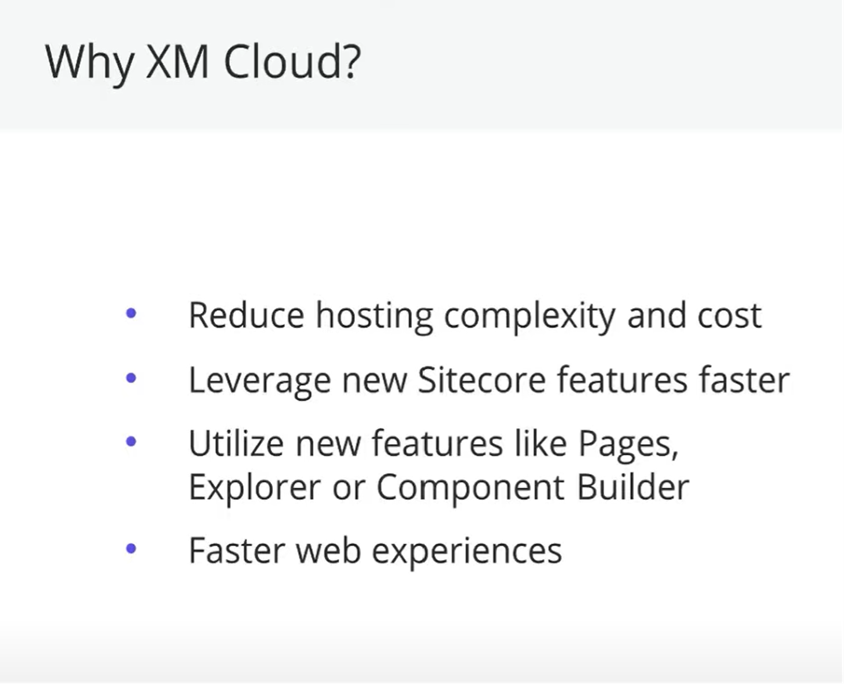
Subscription-based Sitecore SaaS
Automatic version upgrades
Portal-based organization access/user invitation
Headless support
DevOps integration
Decoupled rather than monolithic model
Integrate best-of-breed products
Docker-based
Web-based Components support Static Site Generation
Front-End as a Service
SDK / Service support
Edge / CDN-based deployment
https://www.youtube.com/watch?v=6WMzaK-3swI
Sitecore Cloud Portal: https://portal.sitecorecloud.io

In the Sitecore Cloud Portal, you can assign the following app roles: User and Admin
https://doc.sitecore.com/xmc/en/developers/xm-cloud/creating-users-in-xm-cloud.html
XM Cloud Access Rights

- Default for item access right is deny
- Default for inheritance is allow
- Deny prevails over allow for items
- User access overrules role access
- Allow prevails over deny during inheritance
https://doc.sitecore.com/xmc/en/developers/xm-cloud/assigning-access-rights.html

https://doc.sitecore.com/xmc/en/developers/xm-cloud/grouping-of-headless-site-collections-and-sites.html
Overall XM Cloud Stack
https://navansitecorenotes.blogspot.com/2023/09/xm-cloudpagescomponents-10-interesting.html


Code-First (Disconnected mode):
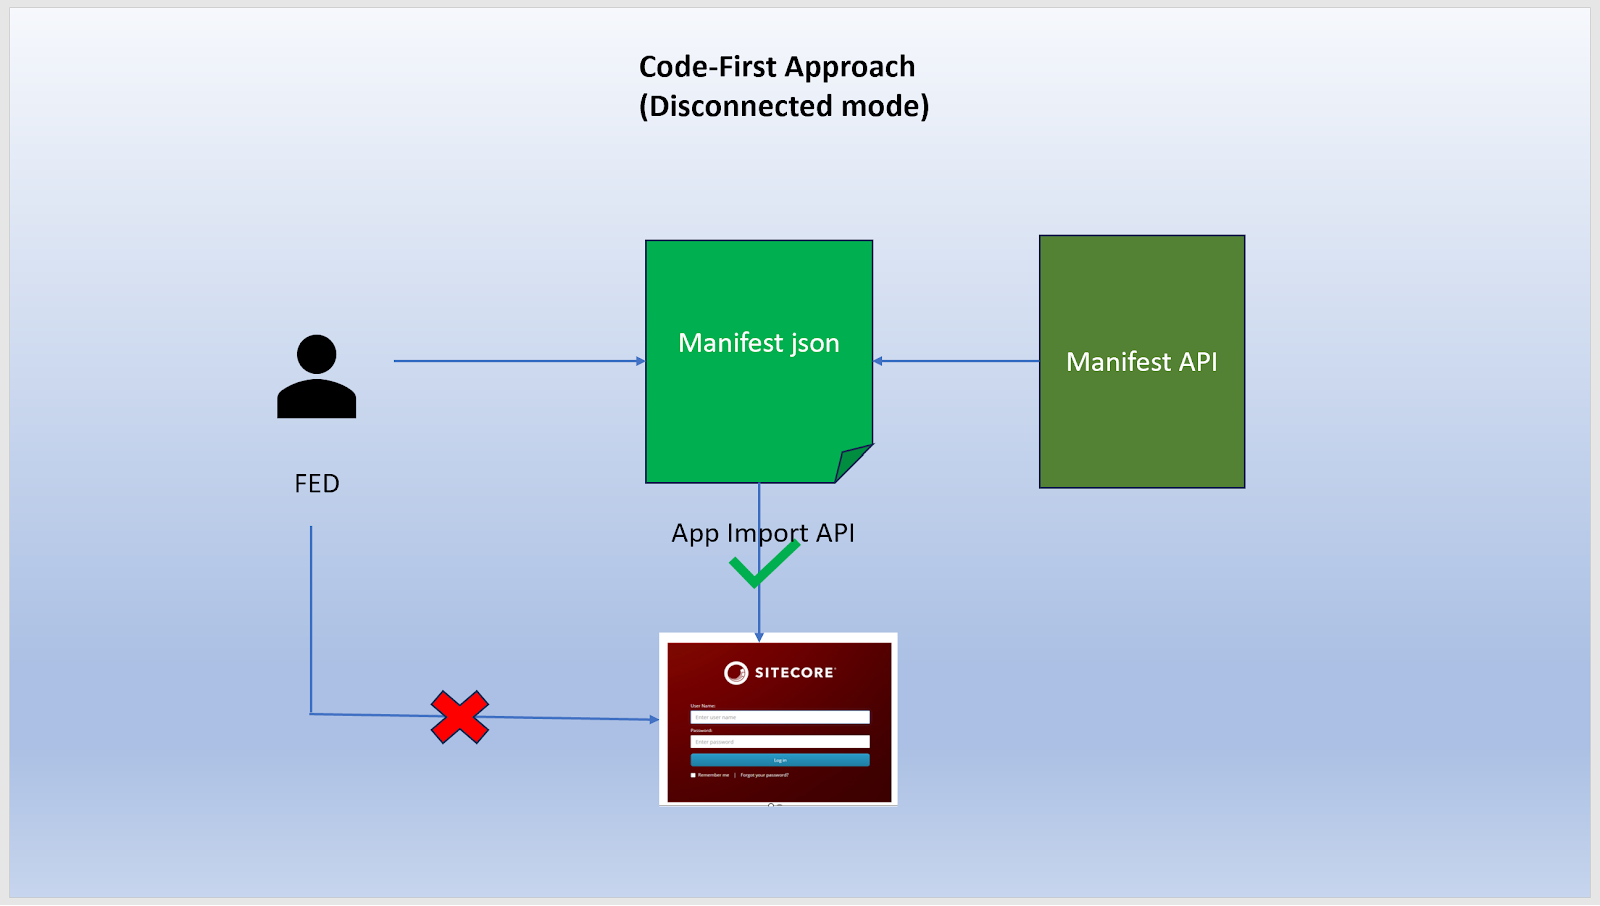
JSS .env file precedence order:

- Log
into and navigate the XM Cloud Deploy Application
- Deploy
a project using a starter template
- Set up
an XM Cloud local development environment
- Define
the attributes of a starter template
- Deploy
a project using Source Code Provider
- Define
compatibility requirements for deploying your own code
- Configure
repositories and environments
- Connect
to your repository
- Create
environments such as production, QA, and test
- Configure
deploys on demand or automatically based on code commits to a watched
branch
- Review
project details to determine deployment status
- Review
logs to troubleshoot errors
Resources:
Getting
started with XM Cloud
(opens in a new tab)
Deploying
XM Cloud (opens in a new tab)
XM
Cloud Deploy app(opens in a new tab)
Create
an XM Cloud project from existing source code in the XM Cloud Deploy app
(opens in a new tab)
Connect
Sitecore Pages to your local XM Cloud instance(opens in a new tab)
Manage
an environment(opens in a new tab)
Create
an XM Cloud project using the Sitecore CLI(opens in a new tab)
Deploy Application Code using CLI:

https://doc.sitecore.com/xmc/en/developers/xm-cloud/walkthrough--creating-an-xm-cloud-project-using-the-sitecore-cli.html
XM Cloud Deployment methods:
1. Deploy App
2. CLI
3. REST API

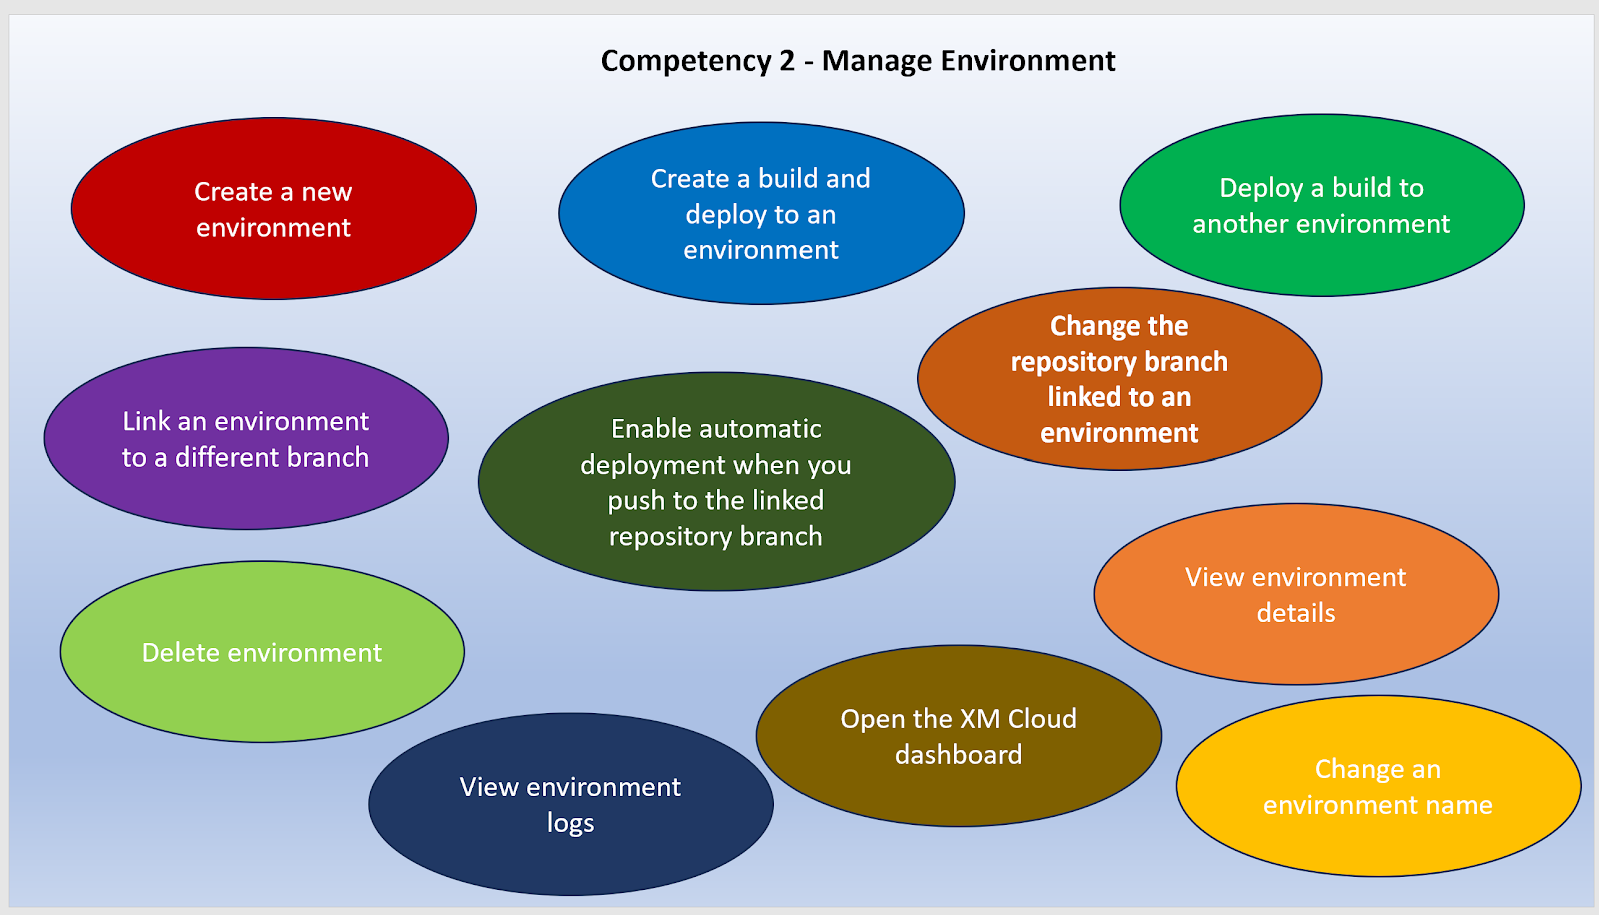
Manage Environment:
- Ability to link a branch to an environment for automatically deploying commits among other features as highlighted below:
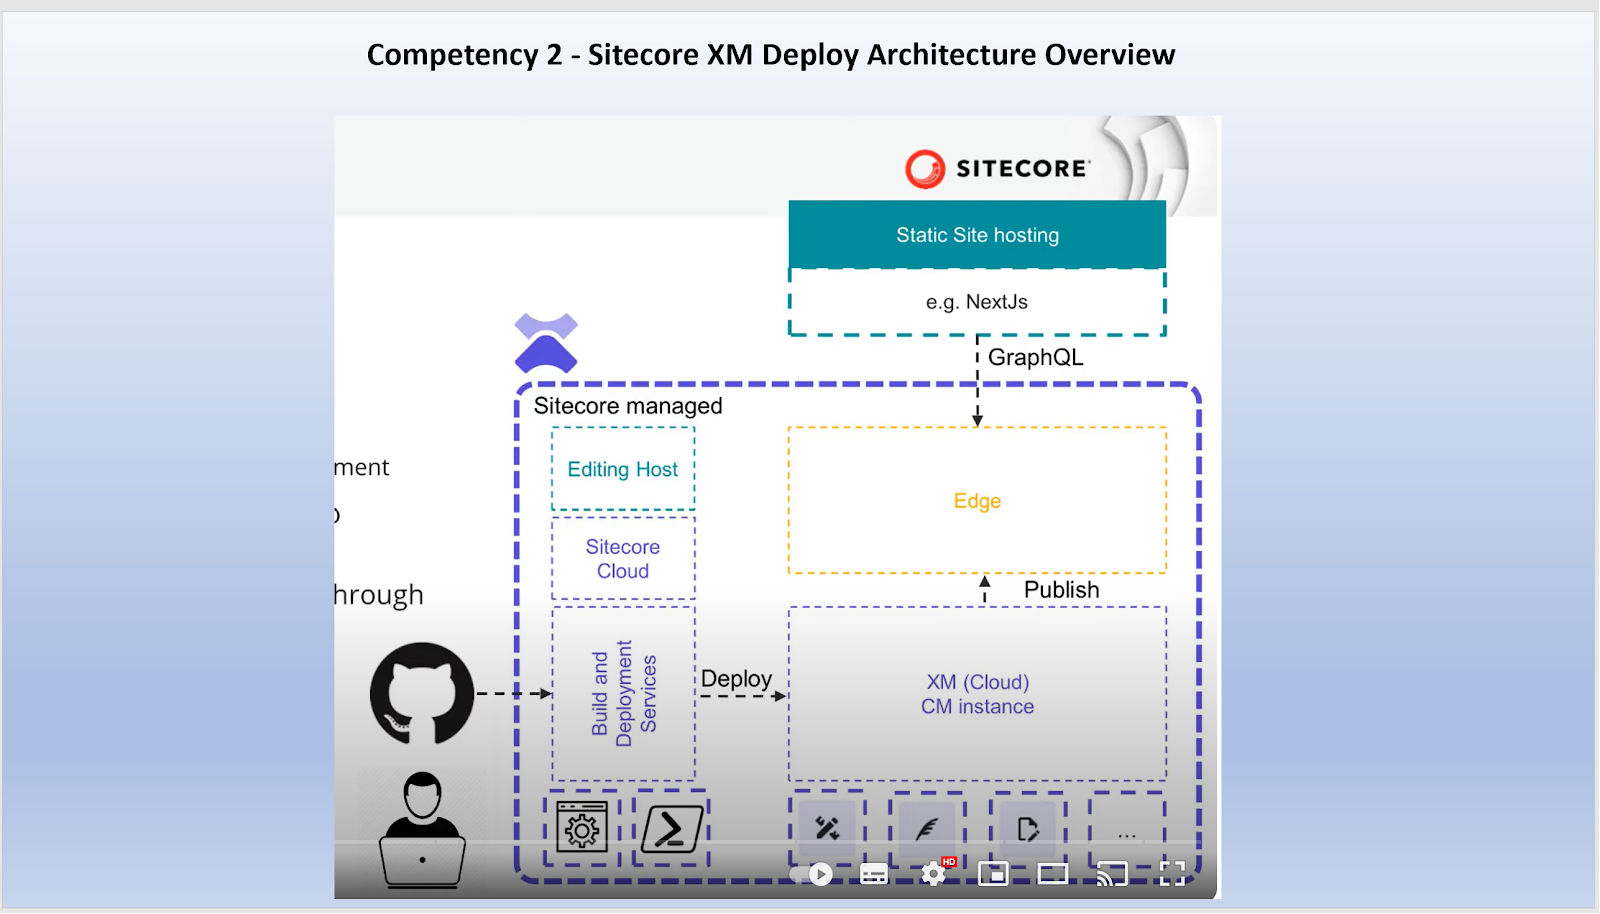
XM Cloud Deployment Topology Overview:

XM Cloud Deploy App steps:


https://doc.sitecore.com/xmc/en/developers/xm-cloud/editing-hosts-and-rendering-hosts.html
Github Connection for XM Cloud Deploy App:
An important process that needs approval if you are a Github Organization member. Only three Github account types supported:


Competency 3 - Renderings and Layouts - 7 questions
- Create new
components using the Component Builder
- Create
placeholder settings items and set allowed controls
- Create and
manage Page Designs and Partial Designs
- Create a
custom SXA module
- Create
component definition items
- Set the compatible
renderings on a rendering definition item
- Set the
Datasource location and data source template fields
- Set up rendering
parameters
- Clone a rendering
- Create and manage
headless variants
- Configure
item security properly for existing and future items
Resources:
(opens
in a new tab)(opens
in a new tab)(opens
in a new tab)Renderings
and rendering variants(opens in a new tab)
Building
components(opens in a new tab)
Registering
an external React component(opens in a new tab)
(opens
in a new tab)Set
placeholder restrictions(opens in a new tab)
Page
designs(opens in a new tab)
Partial
designs(opens in a new tab)
(opens
in a new tab)(opens
in a new tab)Create
and assign a page design in the content editor(opens in a new tab)
Use
the Component wizard to create a custom rendering(opens in a new tab)
Copy
and customize a rendering(opens in a new tab)
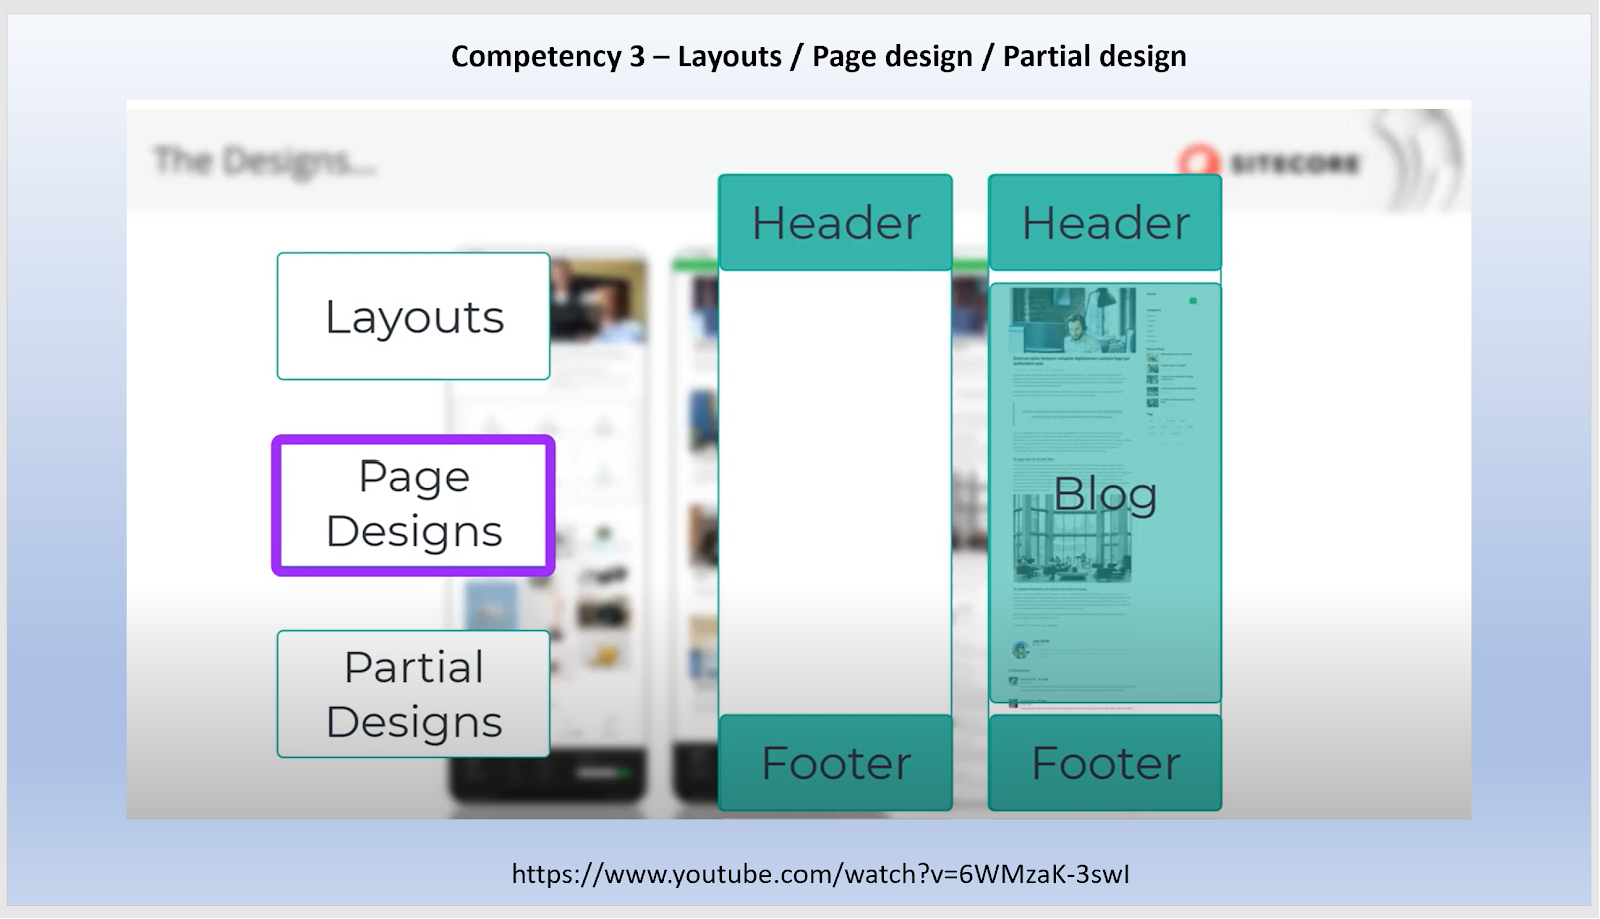
Layouts / Page design / Partial Design:
- Improves Reusability
- Page design composed of partial designs
- Partial design composed of renderings
- Set placeholder restrictions for better streamlining

https://www.youtube.com/watch?v=6WMzaK-3swI
Different layouts for different set of pages:

External Component registration - Important Steps:
- Import package for feaas
- Serialize
and deserialize items from source control using the Sitecore CLI
- Connect to a local or
remote XM Cloud hosted instance
- Configure a
Serialization Module with included paths and rules
- Use
serialization packages for continuous integration
Resources:
(opens
in a new tab)Sitecore
Content Serialization(opens in a new tab)
Connect
Sitecore Pages to your local XM Cloud instance(opens in a new tab)
Configure
excluded fields(opens in a new tab)
Sitecore
Content Serialization configuration reference(opens in a new tab)
(opens
in a new tab)The
CLI serialization command(opens in a new tab)
************************************************************************
Connect Local instance to Sitecore XM Cloud Pages

https://doc.sitecore.com/xmc/en/developers/xm-cloud/connect-xm-cloud-pages-to-your-local-xm-cloud-instance.html
Local Storage Entry
In your browser, navigate to https://pages.sitecorecloud.io. Open the developer tools console of your browser and find the local storage section.
In the Local Storage panel, click the entry for https://pages.sitecorecloud.io to reveal the local storage entries.
Create a new entry by adding a new row with the following values:
Key: Sitecore.Pages.LocalXmCloudUrl
Value: your local (XM Cloud) instance URL. For example, https://xmcloudcm.localhost/
Local Docker .env File configuration
Verify that your local Docker instance is configured to connect with XM Cloud Pages. If correctly configured, your .env file has the following environment variables:
SITECORE_Pages_Client_Host=https://pages.sitecorecloud.io
SITECORE_Pages_CORS_Allowed_Origins=pages.sitecorecloud.io
Refresh the https://pages.sitecorecloud.io page to see your local front-end application
************************************************************************
Content Sync with CLI Connect command

- Then pull from one environment and push to another using env reference name stored in user.json file
https://doc.sitecore.com/xmc/en/developers/xm-cloud/the-cli-connect-command.html
************************************************************************
Important Configuration Files:
CLI Config files:
Sitecore.json:
In case of Sitecore Content Serialization, the project configuration file is named sitecore.json. It has several sections and properties, including module.json path, plugin details, serialization folder name among others
user.json:
Useful in case of Sitecore CLI non-interactive login since it stores cm,auth server details, access and refresh tokens
*.module.json:
Holds details about what Sitecore paths must be included in serialization alongwith scope and exclusion rules
XM Cloud Post deployment configuration:
xmcloud.build.json:
Enables logic plugin for post-deploy activities like,
- Rendering host configuration
- CM Warm-up
- Schema population
- Re-indexing
- Publishing
- Deploy SCS modules: Serialize push should be part of this step to setup necessary Sitecore items in XM Cloud instance
Client-side Config file:
scssconfig.json:
The JSS config file that has Sitecore instance details like deployment secret, API key, instance path among others
General Sitecore Patch file:
sitecore.config:
The Sitecore patch file under App_Config that has event handler details, patch folder and database details among others
************************************************************************
Competency 5 - Sitecore APIs and Webhooks - 5 questions
- Use
Experience Edge API to query an item, layout, or search
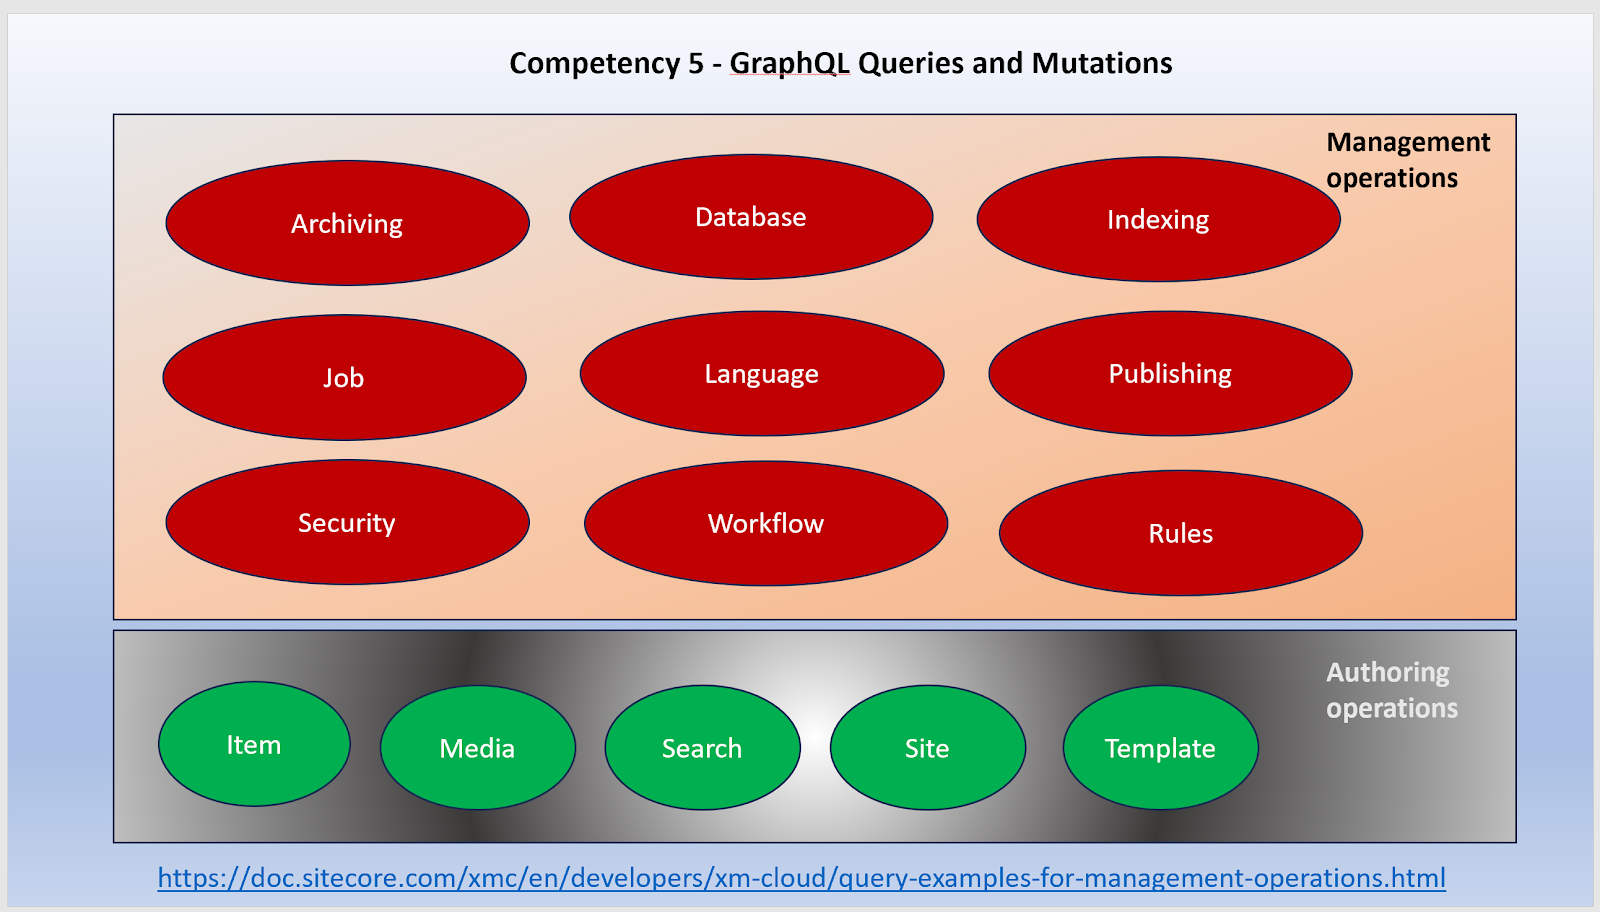
- Use GraphQL
Mutations to create, update, and delete items
- Define and
handle webhooks
Resources:
(opens
in a new tab)Sitecore
Experience Edge for XM(opens in a new tab)
Sitecore
Authoring and Management GraphQL
API(opens in a new tab)
Webhooks(opens
in a new tab)(opens
in a new tab)
Webhooks:

Webhook Validation Action:
A webhook validation action added to a command item of a workflow that changes the state from one to another (in-review to approved) imvoked when the command executes, the webhook then sends an HTTP request to a specified endpoint to validate if state change (approval) must occur.
Webhook event handler:
Configure a webhook event handler to send a request to a specified endpoint when a supported item event occurs.
Webhook submit action
A webhook submit action in the approved state of a workflow fires when an item using the workflow has completely moved to the concerned state (e.g., rejected), then webhook sends an HTTP request to the specified endpoint.
************************************************************************
Webhook submit action vs validation action:
Webhook submit action: State-based:- Webhook attached to a workflow state: when the item reaches the state, webhook executes.
Webhook validation action: Command-based:- Webhook attached to command: when the command executes, the webhook executes. This can be used to invalidate state-change.
************************************************************************
https://doc.sitecore.com/xmc/en/developers/xm-cloud/webhooks.html
Token API vs Deploy API

Different ways to get edge token
- Through XM Cloud Deploy API (invoked by New-EdgeToken.ps1)
- Through XM Cloud Dashboard
- Through token API

|
API
type |
Base
URL |
Format |
|
Delivery
API |
https://edge.sitecorecloud.io/api/graphql |
GraphQL |
|
Token
API |
https://edge.sitecorecloud.io/api/apikey/v1 |
REST |
|
Admin
API |
https://edge.sitecorecloud.io/api/admin/v1 |
REST |
|
Request
JWT Token using OAUTH |
POST
https://auth.sitecorecloud.io/oauth/token |
REST |
|
Preview
API |
https://<xm
cloud inst>/sitecore/api/graph/edge |
GraphQL |
|
Authoring
API |
https://<xm
cloud inst>/sitecore/api/authoring/graphql/v1/ |
GraphQL |
|
XM
Cloud Deploy API |
https://xmclouddeploy-api.sitecorecloud.io/ |
REST |


|
mutation { createItem(
input: { name: "Sitecore Authoring
and Management API" templateId:
"{76036F5E-CBCE-46D1-AF0A-4143F9B557AA}"
parent: "{110D559F-DEA5-42EA-9C1C-8A5DF7E70EF9}"
language: "en" fields:
[ { name: "title", value:
"Welcome to Sitecore" } {
name: "text", value: "Welcome to Sitecore"
} ] } )
{ item {
itemId name
path fields(ownFields: true, excludeStandardFields:
true) { nodes
{
name
value
} } } }} |
Mutation
that creates an item passing item/template details and returns the created
item id, name and path |
|
Example |
Explanation |
|
query {
layout(site: "experienceedge", routePath:
"/", language: "en") { item { homeItemPath: path
contentRoot: parent { id path } } }} |
Get
the root item of a site: Using
layout query |
|
query {
site { siteInfo(site: "example") { routes(language:
"en") { results { route{ id } routePath } total pageInfo {
endCursor hasNext } } } }} |
Get
all site paths/pages |
|
query {
# path can be an item tree path or GUID-based id item(path:
"/sitecore/content/Experience-Edge/home", language:
"en") { # items can be cast to a Template type with inline
fragments ... on AppRoute { pageTitle { value } } # fields can
be cast to a Field type with inline fragments field(name:
"pageTitle") { ... on TextField { value } } }} |
Get
an item by ID or path and
use inline fragments for casting |
|
query {
site { siteInfoCollection{ name rootPath } }} |
Get
information about all content sites |
- Create and edit items using
Sitecore Pages
- Add
and modify components and component properties
- Add components to placeholders
- Differentiate
between Front End as a Service components and Headless SXA Components
- Add
and change a component's data source
- Modify
a component's Grid layout settings
- Use
workflow to publish content
- Preview
a page on multiple devices
Resources:
|
App |
URL |
|
Portal |
|
|
Pages |
|
|
Deploy |
|
|
Components |


|
Feature |
Pages |
Explorer |
Content
Editor |
Exp
Editor |
|
Publish
an item and sub-items |
x | x | x | x |
|
Work
with versions |
x | x | x | x |
|
Schedule
availability |
x | x | x | x |
|
Preview
a web page |
x | x | x | |
|
Publish
a website |
x | x | x | |
|
Validate
an item |
x | x |

Configure device for XM Cloud pages:
- Create
users in the Sitecore Cloud Portal
- Configure
and assign roles in the Sitecore XM Cloud Role Manager
- Manage
permissions for items, roles, and users
- Configure
multifactor authentication
Resources:
(opens
in a new tab)Sitecore
Cloud Portal administration(opens in a new tab)
User
security(opens in a new tab)
(opens in a new tab)
Users,
roles, and domains(opens in a new tab)
Create
and set up a role(opens in a new tab)
The
security roles(opens in a new tab)
The
access rights(opens in a new tab)
User and Security Roles:
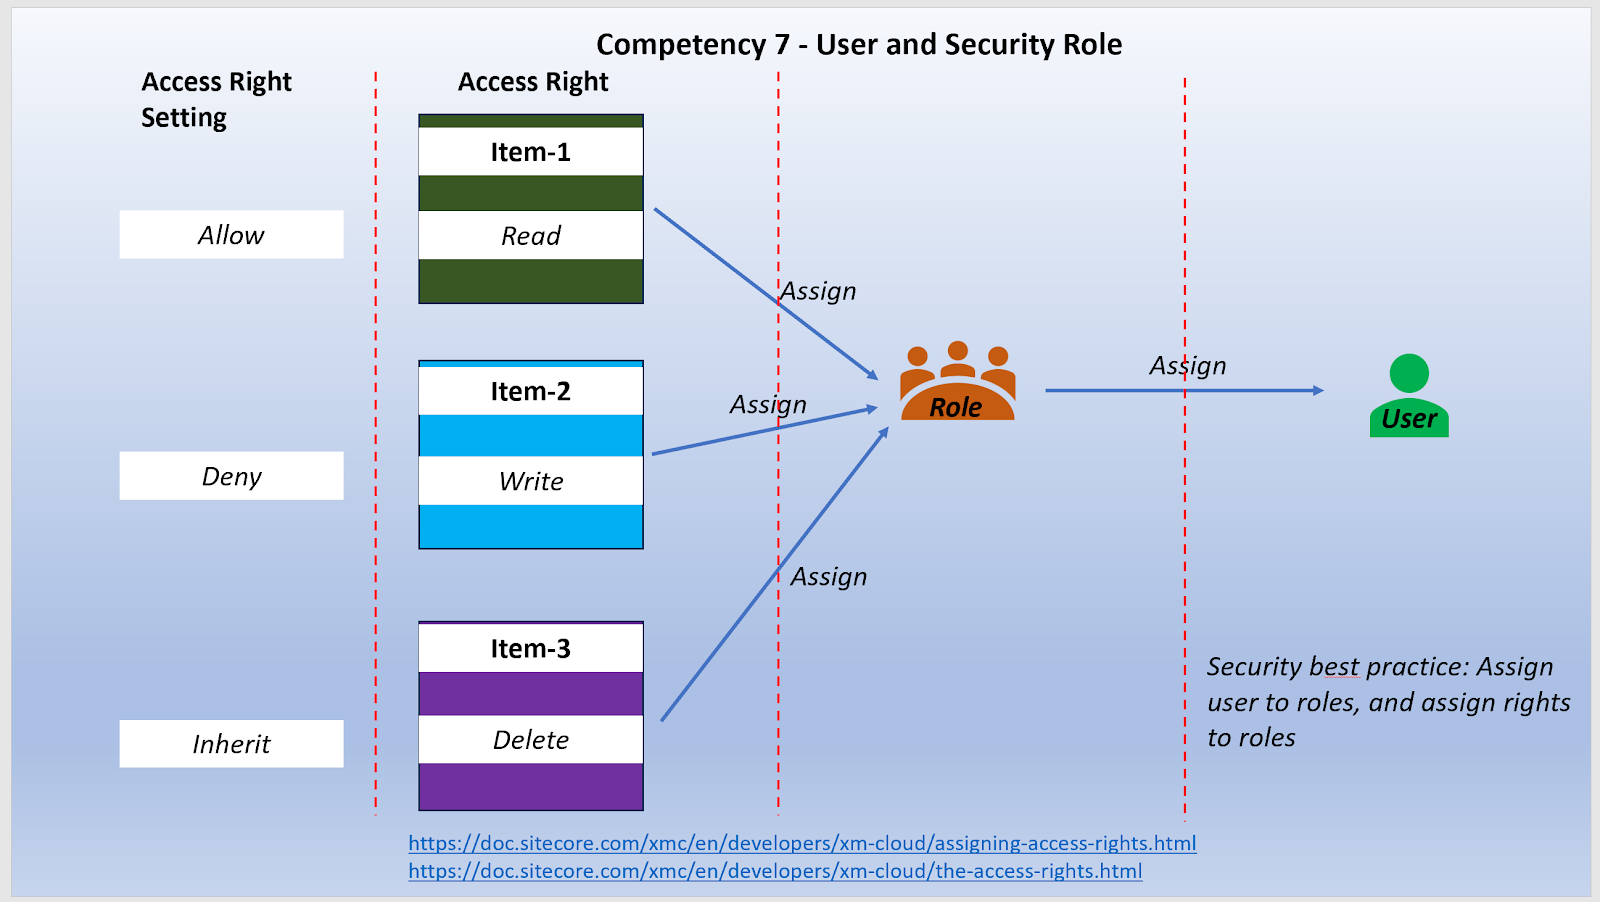
Access right options:
- Read
- Write
- Inherit
https://doc.sitecore.com/xmc/en/developers/xm-cloud/assigning-access-rights.html
https://doc.sitecore.com/xmc/en/developers/xm-cloud/the-access-rights.html
Various Security interfaces:
|
User
Manager |
Role
Manager |
Domain
Manager |
Access
Viewer |
Security
Editor |
Content
Editor – Security Tab |
|
Create,
edit, and delete users |
Create
and delete roles. |
Create
and delete domains. |
Sitecore
item access rights overview for each role/user. |
Assign access rights to roles and
users |
Assign access rights to roles and
users |
|
Change
the password of users |
Add or
remove users and roles as members of a role. |
Specify
whether the domains are global or locally managed. |
See an
explanation of how the current settings have been resolved. |
Protect
and unprotect items |
Change
the ownership of an item. |
|
Enable
and disable users |
Open
the other security tools. |
Open
other security tool |
Open
the Security Editor and the User Manager. |
Open
the Access Viewer and the User Manager |
Get an
overview of the roles and users that have access rights to individual content
tree items. |
|
Lock
and unlock users |
Open
the Access Viewer and the User Manager. |
||||
|
Open
the other security tools |
- Create data
templates, standard values, and set insert options to match the data
structures outlined in a development plan.
·
Configure base templates for a data template
·
Create fields on a data template
- Manage
language and numbered versions of items
- Data Model
mapping to Experience Edge Schema
Resources:
(opens
in a new tab)Data
templates(opens in a new tab)
Standard
values(opens in a new tab)
Insert
options(opens in a new tab)(opens
in a new tab)
Add
a language version to an SXA site(opens in a new tab)
The
Experience Edge schema(opens in a new tab)(opens
in a new tab)
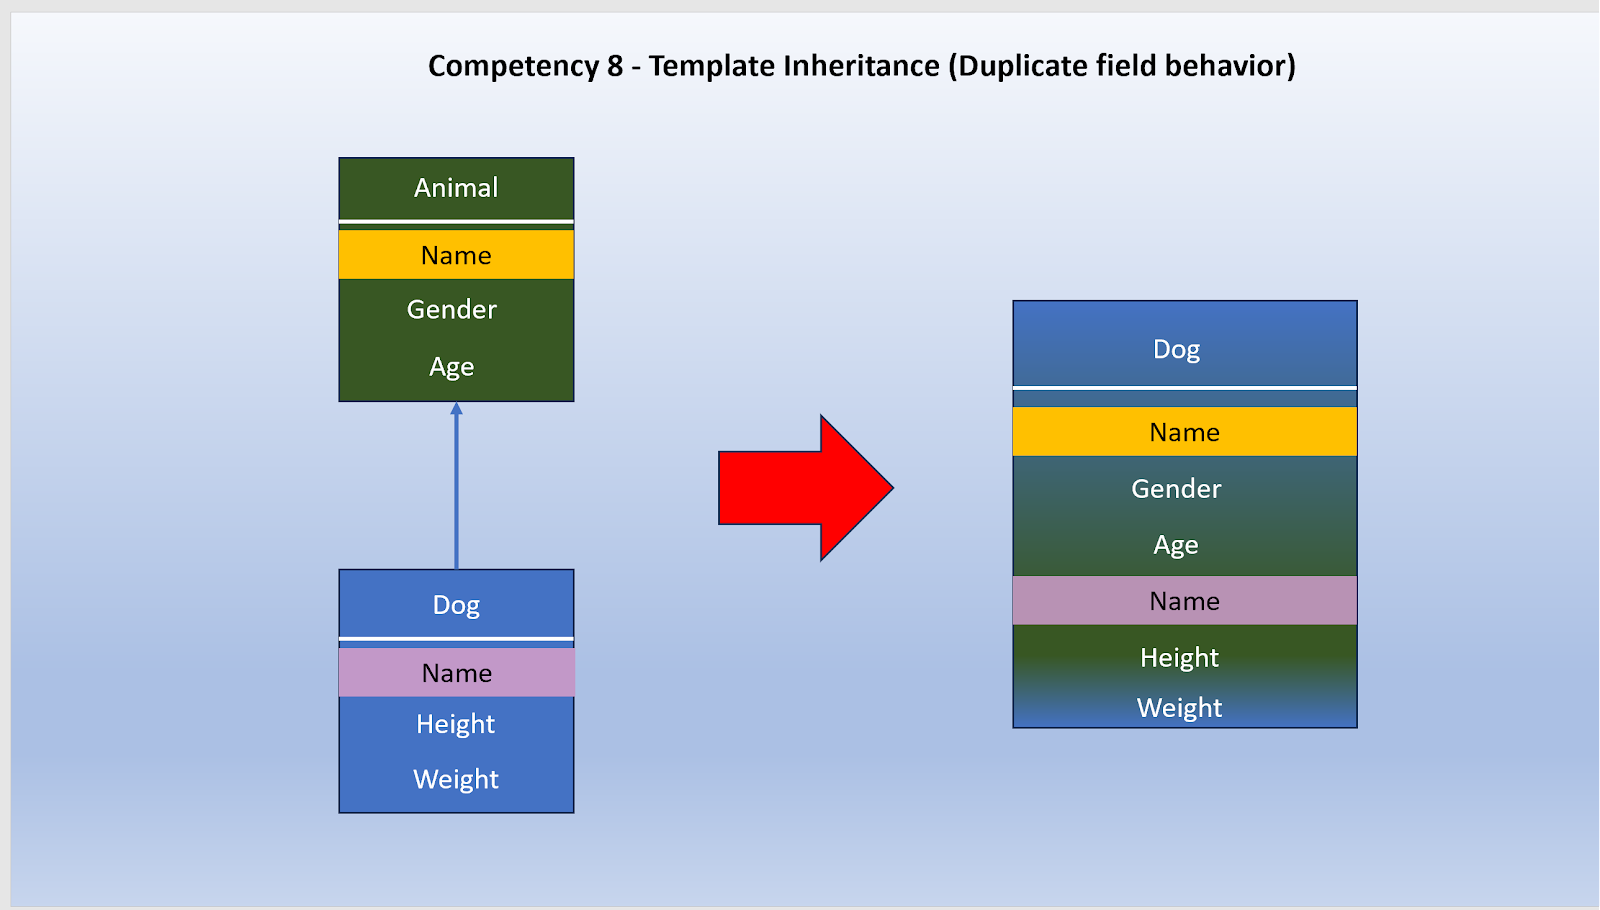
Field duplication due to template inheritance:
Add a language version to SXA Site:
Add Site Language Script: Adds a new language to content items and copies content from source language, doesn't translate content though
https://doc.sitecore.com/xmc/en/developers/xm-cloud/add-a-language-version-to-an-sxa-site.html

Admin API:
|
Endpoint |
Description |
Relative
Path |
Verb |
|
ClearCacheForTenant |
Clears
the entire cache for a given tenant |
/cache |
Delete |
|
DeleteContent |
Removes
tenant data from the data storage. |
/content |
Delete |
|
GetSettings |
Lists
all available settings for a tenant. |
/settings |
Get |
|
UpdateSettings |
Updates
all available settings for a tenant |
/settings |
Put |
|
PatchSettings |
Updates
a setting for a tenant using one or more Patch operations. |
/settings |
Patch |
|
CreateWebhook |
Creates
a new webhook |
/webhooks |
Post |
|
UpdateWebhook |
Updates
an existing webhook |
/webhooks/{id} |
Put |
|
DeleteWebhook |
Deletes
an existing webhook |
/webhooks/{id} |
Delete |
|
ListWebhooks |
Deletes
all webhooks in a tenant |
/webhooks |
Get |
|
GetWebhookById |
Gets a
specific tenant webhook |
/webhooks/{id} |
Get |
Base URL: https://edge.sitecorecloud.io/api/admin/v1
https://doc.sitecore.com/xmc/en/developers/xm-cloud/admin-api.html
Important Points:
SPE scripts available for Remove Site Collection, Remove Site, Remove Site Collection Folder, or Remove Site Folder
Roles in XM Cloud Organization-level: Organization Admin / Organization Owner and Organization User
In XM Cloud, Organization user is a role, NO role named organization member
In the Sitecore Cloud Portal, if a team member has an Organization Admin or Organization Owner role, they have an Admin role in all XM Cloud apps in the organization.
You cannot delete the user or remove their administrator role in XM Cloud deploy app. You must delete the user or remove their administrator role from the Sitecore Cloud Portal.
To use XM Cloud Deploy app, you must have an Organization Admin or Organization Owner role in your Sitecore Cloud Portal organization. An organization admin or organization owner can grant a team member access to the XM Cloud Deploy app by changing their role.
To create a new XM Cloud project, you must be an organization admin or organization owner in an XM Cloud organization.
If source code repository is other than GitHub, use Sitecore XM Cloud CLI for deployment
From the deployment log, you can also cancel a running deployment, rerun a failed deployment, promote the deployment to another environment, download logs, or open the XM Cloud Dashboard.
The deployment log displays the progress, status, warnings, and errors of an XM Cloud deployment
Download XM Cloud log files with this command: dotnet sitecore cloud environment log download --environment-id <env-id> --filename <filename>
In the Content Editor, you can set placeholder restrictions for your layout placeholders. These restrictions are applied on all pages in the site.
In the Experience Editor, you can create placeholder restrictions on specific pages instead of all the pages that belong to a site.
Do not add components directly to page designs. Page designs cannot hold the information on their own, but refer to the information stored in the partial designs. So if you add components directly to the page designs, they do not render on the page.
In XM Cloud pages you can assign a template to a page design and also duplicate/rename data template but data templates must be created in Content editor
In the publishing pipeline, dependencies are calculated at the item level. For example, you might change a data source item of a page in the navigation. Because the page is dependent on the data source item, and is rendered by the navigation component, any page containing the navigation component has to be republished. So, publishing is efficient as a bulk of related items.
In Sitecore Content Serialization, ItemandDescendants is default scope
In Sitecore Content Serialization, One-level down scope is ItemandChildren but ItemandDescendants includes grand children too
You can exclude fields from serialization by specifying them in the sitecore.json config file and any *modules.json file
If the path of a specific module file is not set in the sitecore.json file, the paths and related items included in the module will not be serialized when you run a push or pull command
You can use the sitecore ser watch command to monitor changes to content items in a Sitecore instance and automatically serialize the changes to your file system.
In case of Rules section properties in module.json, path and scope are mandatory
In case of includes section properties in module.json, name and path are mandatory
createItem GraphQL mutation is used to create Sitecore items
Using the GraphQL IDE requires that you are at least in the sitecore\Sitecore Client Users role.
Admin API: ClearCacheForTenant - Clears the entire cache for a given tenant.
The Sitecore Authoring and Management API provides a single endpoint and schema that allows you to manage your Sitecore content using GraphQL
Sitecore Data Exchange Framework is designed to facilitate data transfer between Sitecore and third-party systems
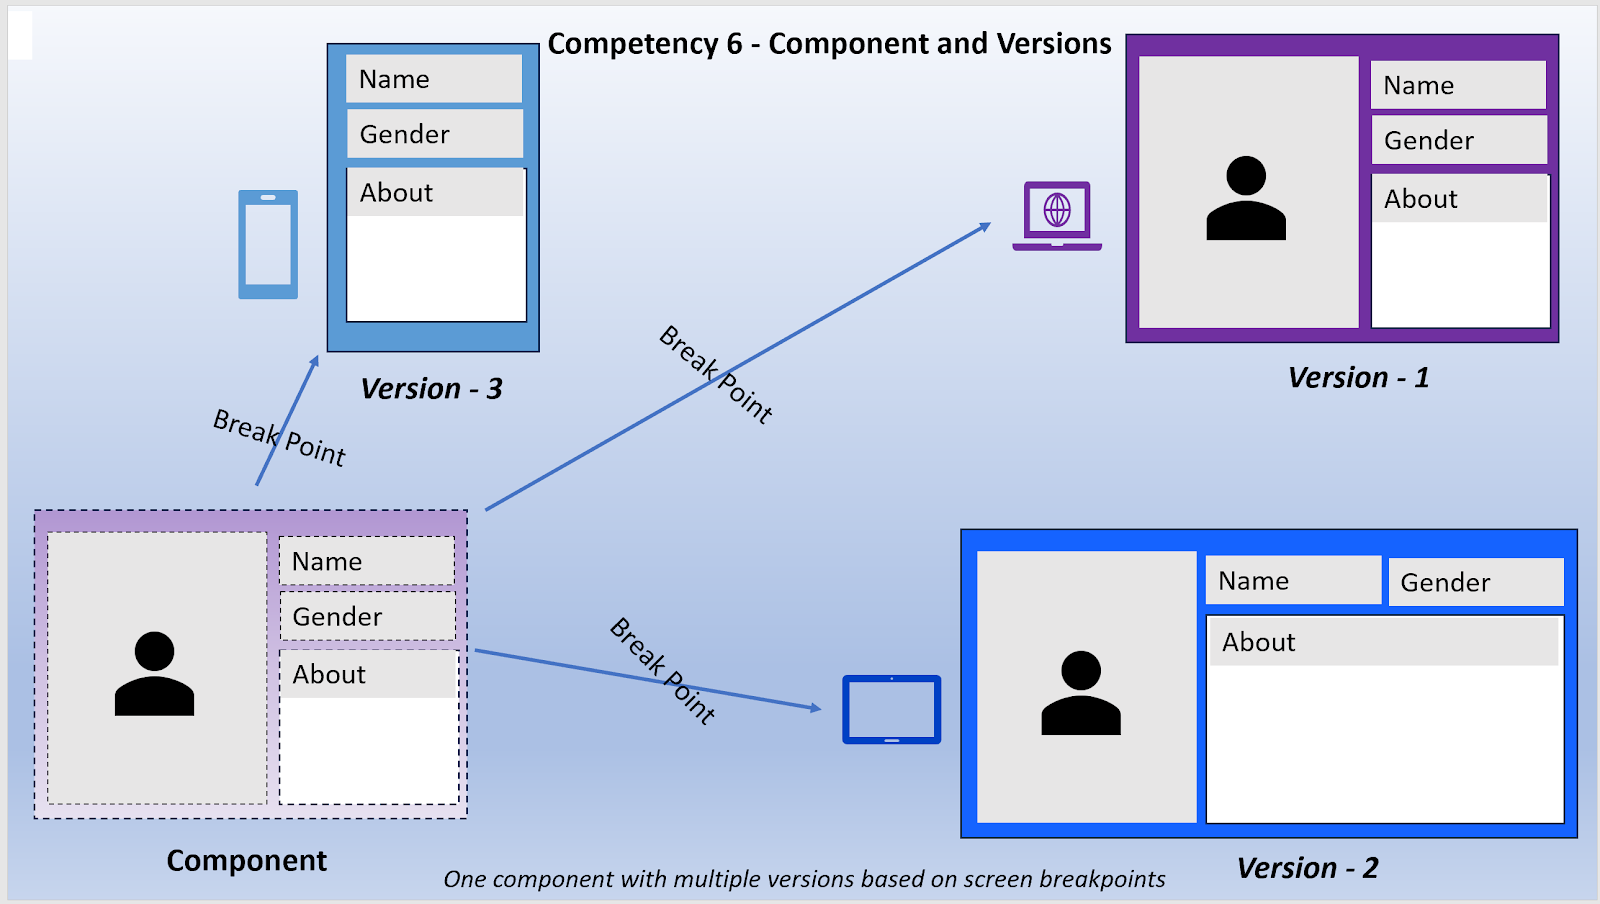
Rendering variant is useful to display the same data structure (field sub-sets) in different ways
The SXA grid system (using html/css) provides consistent responsive layout/styling across a site, if you change the grid system after creating the site, it will break the site layout due to reference (like, css) to previous grid system
If a user is a member of several roles and one of these roles is specifically denied an access right to an item, the user is denied the access right.
Remember that Access Viewer is to view security mapping and an explanation of the setting while Security Editor is to edit security while both are useful for user/roles
Insert Options (set in template standard values) is mainly used to streamline options under a parent in the content tree
Standard Values help define default field values, usually go hand-in-hand with tokens
Configure rendering Datasource location to restrict content editors to select content from a specific location in the content tree
Configure Datasource template to filter content items based on a template
Specifying Source for a field in template helps showing a filtered data list from the concerned content tree location
A field can get duplicated in child item due to its presence in base template so, with template inheritance in place, ensure field names are unique
*******************************************************************
Practice Questions (from Sitecore Elearning, just added links and explanations)
Meanwhile, no prizes for guessing that some questions from this list might appear in the actual exam!
1. A multinational clothing company wants to create brand sites for its online presence. Each site would have unique branding, content, and components. The content architecture requires a site per region. Which approach should be taken to deploy the rendering host?
A. Use separate instances of XM Cloud for each brand and country to maintain separation
B. A single rendering host application using the JSS multisite feature
C. Create a single site collection and site for all brands, countries, and manage their resources manually
D. A rendering host application deployed for each site
Ans: 1 D
Explanation: The clue here is separate content and site per region. These things drive cdn caching for faster delivery and that is where a separate rendering host per site is useful.
2. A developer intends to carry out a deployment on XM Cloud. However, the ongoing project isn't utilizing a source code provider that offers a pre-built connector for XM Cloud. How could they achieve the XM Cloud deployment?
A. Employ the Sitecore Cloud CLI to construct a project, set up an environment, and initiate a deployment process.
B. Utilize Vercel to establish a connection between the source code provider and XM Cloud, allowing for a successful deployment.
C. Create a custom connector to be used with the XM Cloud Deploy App to create a project, environment, and deployment.
D. Generate a Sitecore Update Package using SCS, incorporating the required items and files for the deployment.
Ans: 2 A
Explanation: Since the supported source code provider is Github for XM Cloud deploy app, in case of using other source code providers, either XM Cloud REST APIs or CLI must be used. Only option A has CLI in it.
3. What happens when a developer creates a new GitHub connection using the XM Cloud starter template within the Deploy app?
A. The Sitecore XM Cloud Instance Manager will approve, install, and authorize your request for all repositories.
B. The Sitecore Deploy GitHub App will be installed and authorized on your personal account, organization, or enterprise.
C. The GitHub connection will make all repositories created by the Deploy app private.
D. The GitHub connection will create a new Enterprise Managed User account.
Ans: 3 B
Explanation: In case of A, there is no concept called XM Cloud instance manager, C delves into a topic that is secondary to the area of the question and only the created repo will be private, D delves into totally unrelated area since account creation is not part of this flow to say the least. B is relevant and is what covered in documentation
4. What functionality does the Components builder offer in XM Cloud Components?
A. Modify and style existing components but cannot add dynamic content.
B. Create and modify existing Headless SXA components.
C. Allow embedding responsive components into XM Cloud Pages.
D. Add and position visual elements, configure style rules, dimensions, and spacing, and map dynamic content.
Ans: 4 D
Explanation: This link exactly covers point D. Others either negate existing feature or are irrelevant
5. Which of the following is a required include property used in the Sitecore Content Serialization (SCS) system?
A. scope
B. database
C. AllowedPushOperations
D. path
Ans: 5 D
Explanation: This link has the include properties table and in that table, name and path are marked as required
6. If the path of a specific module file is not set in the sitecore.json file, what will happen when a developer runs a standard serialization push or pull command?
A. The developer will receive a warning advising them that some modules are not included and ask if they wish to include them in the serialization attempt.
B. The paths and related items included in the module will not be serialized when the developer runs a push or pull command.
C. When a developer runs push or pull serialization commands, the tool used will search for module to access the includes.
D. Only select items in the specific module will be serialized, but it will not include all of them.
Ans: 6 B
Explanation: The simplest logic is, since the path itself is unknown to the serialization setup since sitecore.json is the reference, the items in the concerned module.json won't be serialized although the module.json might be present in the file system and thus the tool is agnostic to warn or throw errors
7. Which of the following options best describes the purpose of the query below to the Experience Edge GraphQL schema?

A. Get items filtered by multiple paths
B. To get all site paths/pages
C. To get information about all content sites
D. To get the root item of a site
Ans: 7 B
Explanation: Straight from query examples
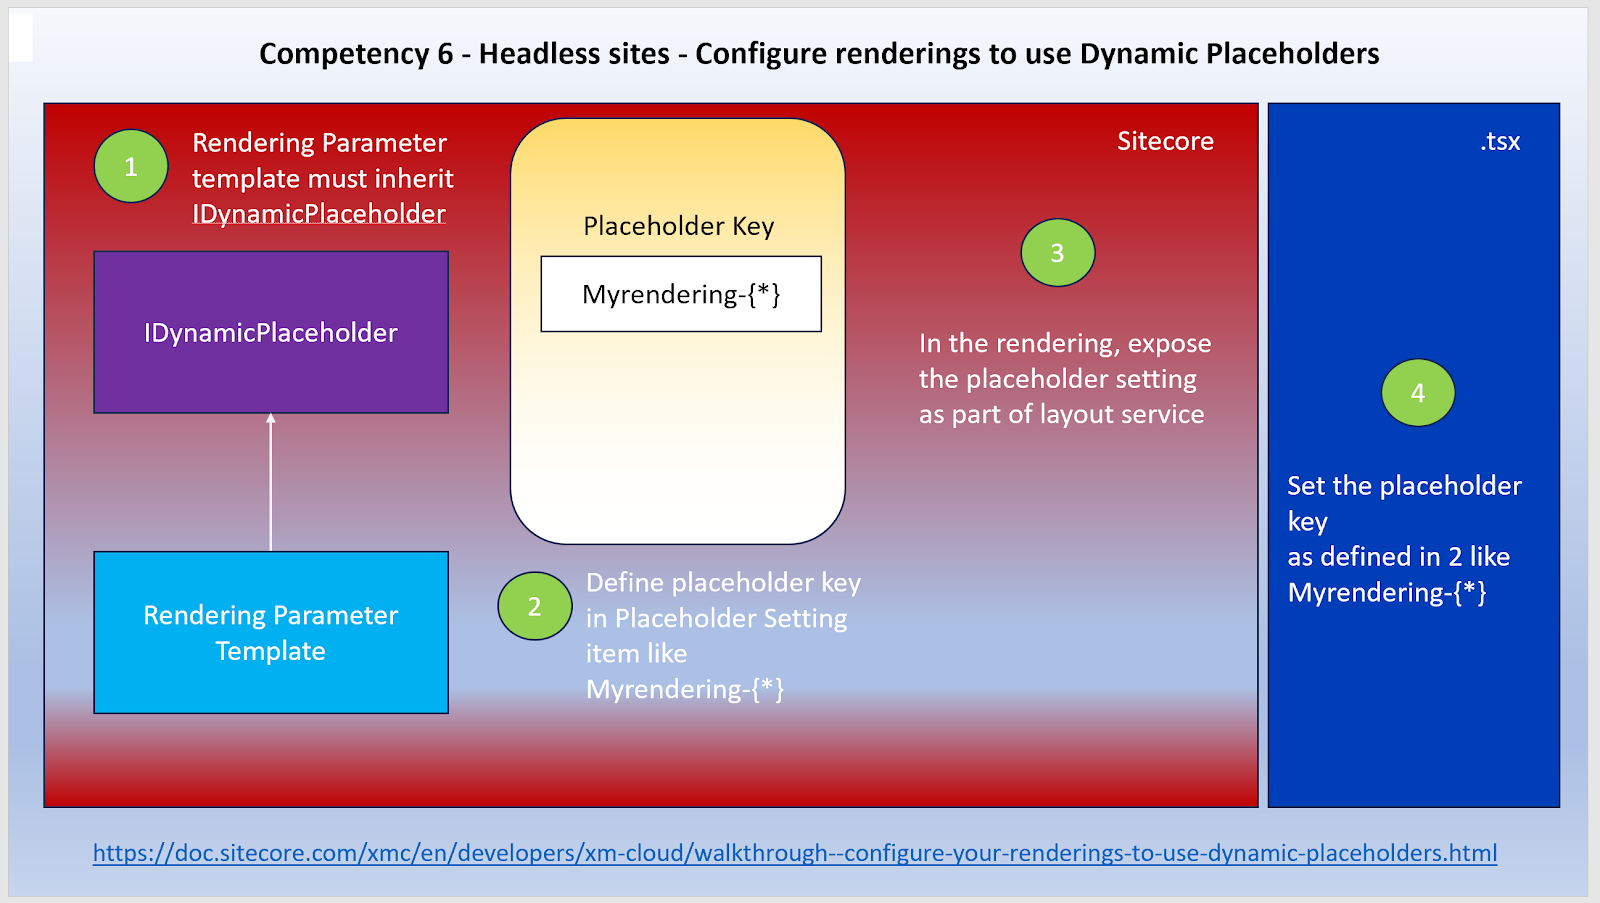
8. To configure a rendering to use dynamic placeholders, which of the following steps is required? (Select all that apply.)
A. Define the placeholder key using a question mark (?) in the placeholder settings item
B. In the component TSX file, set a unique placeholder key value that has not yet been defined
C. Include the IDynamicPlaceholder base template in the Rendering Parameters template
D. Link the placeholder settings item to the rendering item
Ans: 8 C, D
Explanation: One of the most trickiest questions in terms of minor changes in wordings. In case of option A, ? is wrong wild character and instead * is used, in case of B, the placeholder key is actually defined in placeholder settings item and passed into tsx file to form dynamic values. Reference link here
9. As a developer, why should you assign security to roles instead of users when setting up security on a site?
A. Assigning security to roles enables individual rights and permissions to be configured by users.
B. Security can be managed more efficiently as the rights and permissions apply to a group of users.
C. Individual users with a role can set their own item security permissions.
D. Role-based security allows multiple users to have the same username and password.
Ans: 9 B
Explanation: Most simple and straight forward of all questions explaining the purpose of roles
10. What type of field and datasource setting should be used for a developer who is creating a blog component that necessitates the display of the blog's Author from a predefined list?
A. TreeListEx with the source property set to the root item containing the Authors.
B. Droplink with the source property set to the root of the site.
C. Multilist with the source property set to the root item containing the Authors.
D. Richtext with the source property set to a valid Richtext options template.
Ans: 10 A
Explanation: Clue here is one blog author and selection from predefined list. Also, best answer option should be specific in terms of from where the selection or source field must point to and that is option A.
******************************************************************
What-if I don't find my exam certificate in learning portal (LMS)?
You must give about a few hours time to see your exam certificate in LMS - on click of the badge alongside the course in list of courses: My Transcript > Courses

These links are useful in case if you don't find your certificate even after a day since you passed the exam. You can create a Learning@Sitecore case as per instructions how to contact Learning@Sitecore support. In case if you aren't able to login to LMS or raise a support case, email the below Support portal and LMS addresses. Resolution of the issue could range from a couple of days to weeks.
Support Portal:
Email Address: supportportalaccess@sitecore.com
Link: Sitecore Support Portal
LMS:
Link: Learning Portal
Email Address: globaltraining@sitecore.com


Hi Navan, Thanks for Spending time and sharing this Blog, PPT, Video -to clear the exam , the consolidated concepts in XMC and details provided in each section in the Crash Course supported and in implementation as well.
ReplyDelete