XM Cloud/Pages/Components - some important points
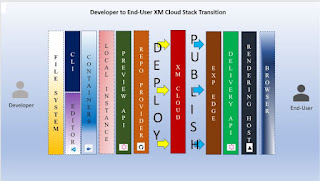
1. The XM Cloud documentation depicts architecture diagrams at various levels from XM Cloud CM instance to Experience Edge and use of CLI to deploy code apart from use of editing host and rendering host in the mix... For a change, I wanted to put altogether in a developer to end-user transition stack and this is what I could come up with.... the idea is to show tech stack closer to developer and then what falls closer to the end-user... hope this conveys the same... Note that it is up to the intelligence of the reader to understand the finer details like repo provider is depicted next to XM Cloud just to highlight deployment capability using CLI or the tool and Preview API is actually dependent on the Sitecore XM Cloud CM instance!
2. It is now well-known that publishing in XM Cloud means content becomes live moving from CM instance to Experience Edge... the most important part of this equation is Experience Edge Connector that sits between the XM Cloud CM instance and the Exp Edge... the publishing process by the Exp edge connector seems interesting in this case since it is like a hand-picked approach wherein only changed and that too related items in the tree gets ready to be moved to Exp Edge by the generation of first a manifest and then, the items in this manifest are created as entities for the actual publish in an event-based approach, something like this:
3. Once content is published to Experience Edge, in the Vercel side, apart from the Github project artifacts the following are the Vercel deployment pre-requisites for the Vercel project.... basically, with these environment settings, Vercel knows what Edge Application it is deploying....
4. In XM Cloud, Code deployment can be done via XM Cloud Deploy interface, CLI or REST APIs... since the XM Cloud Deploy interface supports only Github repos, CLI plays a vital role in deploying code from other providers... however, you will have to clone the code locally to use the CLI for deployment... the following image depicts the deployment process apart from attempting to show the relationship between the involved entities... since a build can be promoted to multiple environments and each environment can have multiple deployments the relationship in the ER diagram must be many-to-many… also, an instance can have multiple deployments and each deployment can probably go to multiple instances so, that ER must also be many to many in the diagram!
5. One of the most important tools for Sitecore XM Cloud development process is Sitecore CLI >= 5.0.0 since this CLI version supports the XM Cloud plugin... among many things this plugin can accomplish is the generation of edge token that is useful in accessing the Delivery APIs as well as the concerned GraphQL IDE... here is the diagrammatic depiction of the Edge token generation process wherein the New-EdgeToken.ps1 is part of the starter XM Cloud Github code...
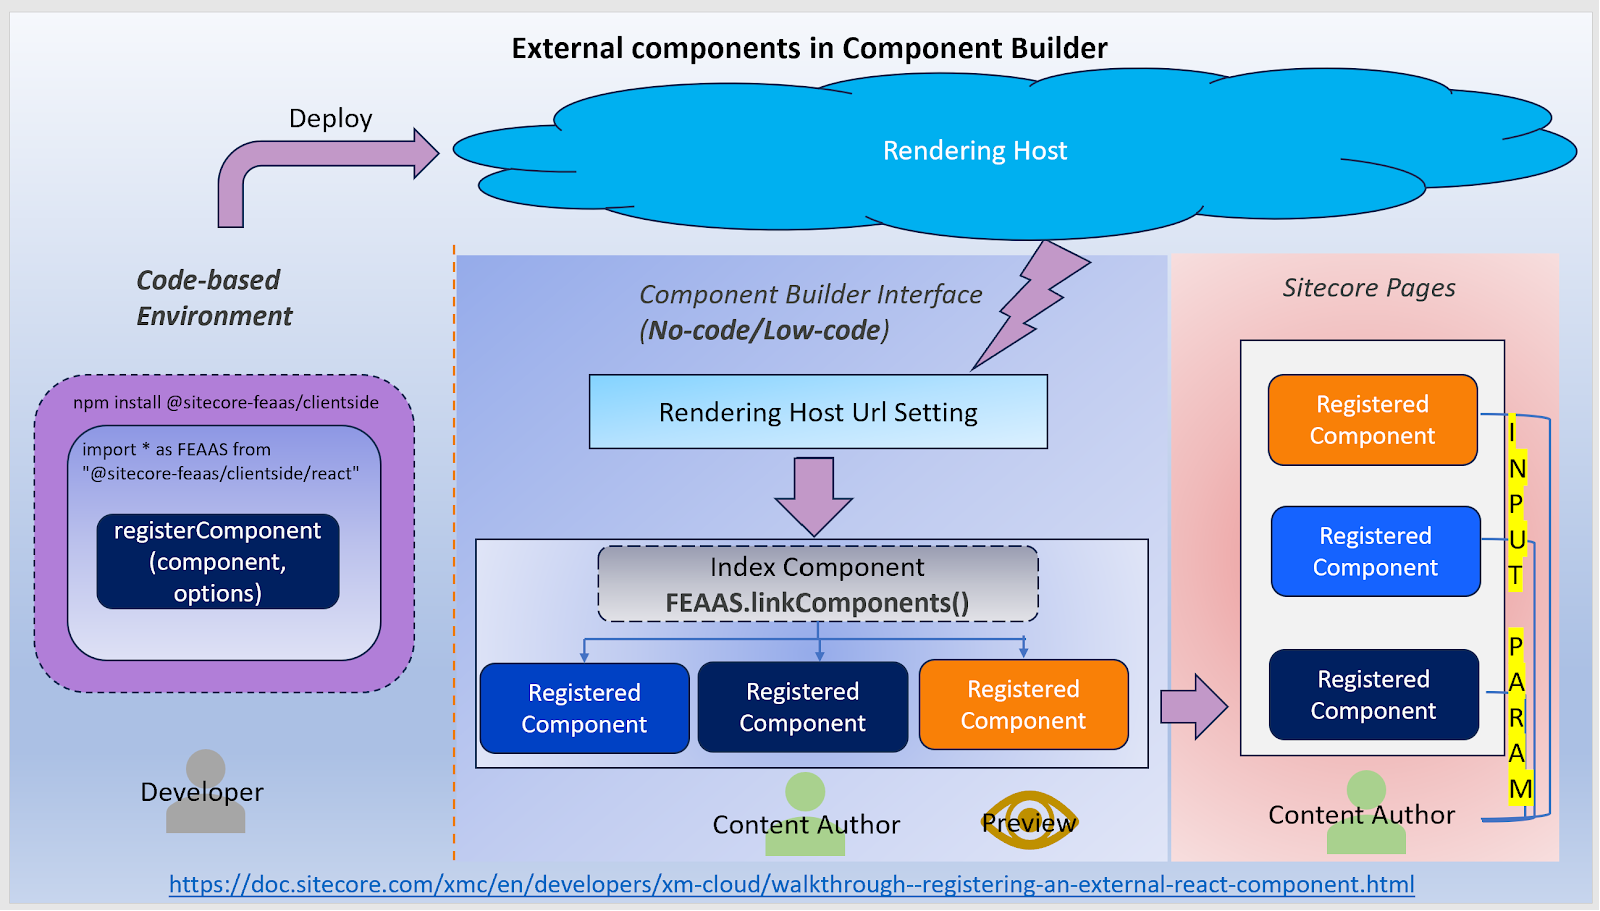
6. The new kid in the block is XM Cloud Component Builder which is still in early access... in this diagram below, I depict how data template(s) from an XM Cloud instance can be exposed as Front-End as a Service through Site Settings and then such a data source is available for field mapping in XM Cloud Component Builder... after design and field mapping, a new component can be staged and available in XM Cloud Pages... in a page within XM Cloud Pages, once this component is drag-dropped, linked to a content item from the XM Cloud site, it can be published and available live literally without writing any code at all... while XM Cloud CM instance is the data provider in this case, you can use other Sitecore apps like Content Hub One to be the data source provider if exposed as a GraphQL endpoint.... in other words, Component Builder can consume data from following format/source - JSON, GraphQL/REST endpoints...
7. Note that XM Cloud components are built as web components that are html-friendly but render differently on an XM Cloud page based on JSS version.... Server-side rendering has its own benefits like SEO-friendliness apart from browser compliance.... based on release notes, JSS 21.2.* (in other words >= 21.2.0) seems to accommodate SSR for XM Cloud components by wrapping the component with React Server component... in other words, the html dom is created in the server-side and sent to the browser... if using versions before JSS 21.2.*, web components will be rendered on client-side and feaas-component tag is probably useful in rendering the actual html dom.... the server here is nothing but CDN hosts like Vercel Netlify or other such hosting providers....
8. When a XM Cloud component is staged, it is available in Sitecore Pages and when the component is published, the component is available in the live site... here is a slide that shows different component states as well as labels displayed in Sitecore Pages... note that there are a lot of intermediate states like previously published which is the state when a component in XM Cloud Components is different from the component staged in XM Cloud Pages and saved on the Edge.
10. In case of XM Cloud Deploy App, it is important to understand the different stages of the deployment process, understandably, most of it is configuration-based, in other words, if you provide the necessary structure in the github repository, the app deploys it for you... in this diagram, I've tried to depict the different stages of deployment and what happens in each stage...
11. Now, it is pretty well-known that published content from experience edge is accessed through delivery APIs... and it is history that Delivery APIs are GraphQL-based... then, you also have a GraphQL playground to test your Delivery API queries... when you go through the documentation, you might have a feeling that there are a few steps to keep in mind before invoking the Delivery API... so, this diagram puts all that in one place....
b. Create JWT using oAuth with 1 as input
c. Pass JWT obtained from 2 as bearer token for Token API
From 3, you get the sc_apikey token
d. Pass the sc_apikey token from 3 as header for Delivery APIs
13. The fun of any headless application is when the head developed in a front-end technology of choice gets interfaced to the Content through an API... in the following diagram, I have depicted the whole flow of how a configured GraphQL preview/delivery endpoint gets plugged onto the Front-End application through a couple of .env file configurations.... Note that currently headless and XM Cloud fully support NextJS front-end technology stack....
15. One of the interesting (Sitecore Pages) features provided in the Sitecore documentation is, the ability to view the local Docker instance (aka development environment) front-end (rendering) in Sitecore Pages - pages.sitecorecloud.io... this seems vital since the local Docker instance cannot connect to Sitecore Pages on initial Docker Setup... so, it involves the following steps:
Pre-requisite: Local Docker instance cloned from Github with XM Cloud application code
1. Navigate to pages.sitecorecloud.io and in browser local storage add local instance entry with Sitecore.Pages.LocalXmCloudUrl as key
2. Ensure Docker instance .env file has entries as per diagram pointing to pages.sitecorecloud.io
3. Local Docker instance is running in connected mode
4. Refresh pages.sitecorecloud.io browser (Browser-1) to see local rendering/front-end
19. Although webhooks are useful sending system notifications, there is an interesting piece of information in XM Cloud documentation about webhook types deserving a diagram of its own... so, here are the three webhook types in one diagram:
2. Webhook submit action: Attached to workflow state of an item, triggers when an item enters the state
3. Webhook validation action: Attached to the command and useful in invalidating the state transition
- A Github organization member can raise a request for a Github connection
- Only a Github Organization owner can approve the Github connection request for deploy app access (also called as install)
- Since XM Cloud starter template is boilerplate code, deploy app needs access to all repositories in the Github account so that XM Cloud deploy app can automatically create the repo in target Github account
- In case of your own code repo, you can request deploy app access to just your selected repo... in other words, if you cloned the starter template manually, it becomes part of your code repo and thus access can be restricted to just this cloned repo rather than access to all repos


Comments
Post a Comment