This blog article covers difference in option list vs taxonomy then dives deeper by making a label property visible based on a sub-item selection in a hierarchical option list. You should have access to a Sitecore Content Hub Sandbox instance and this one uses Sitecore Content Hub v 4.1.1.
Since the Sitecore content hub certification exam covers questions on the process of setting up relation/optionlist/taxonomy members within a schema, this blog article primarily covers toggling a label property based on a specific option list value, here are the high-level steps involved for the same:
a. Create the option list
b. Target schema is the one that has the member field too, label in this example
c. In the target schema, create option list field of the type created in step a
d. Member field Conditionals will be populated with the option list name after step c
e. Add condition for the concerned member field and select the required option list value
f. Label should be visible once the concerned option list item is selected in the detail page.
Now, some basics about taxonomy and option list before we get into the details:
1. From settings, access taxonomy and create a taxonomy as follows:
2. Create taxonomy items:
3. Search and find the created taxonomy to be sure:
4. Next, create an option list:
5. Specify hierarchical or flat, will choose hierarchical, in this case:
6. Add items to the option list:
7. This is how my hierarchical option list looks:
Note that there is no way to set conditional visibility or security toggle here.
On the other hand, the taxonomy has more settings/toggles:
8. Now, let's create a member group within the taxonomy and secure that member group:
Note: No concept of members or groups in option list
9. Just for reference, its possible to add members within a taxonomy:
Can delve deeper into members going ahead with schema or so-called entity definition.
10. Now, on checking the schema list, should find the entity schema, taxonomy schema all in one place but not option list since the latter is treated differently compared to the former two:
11. The next step is to define a new schema:
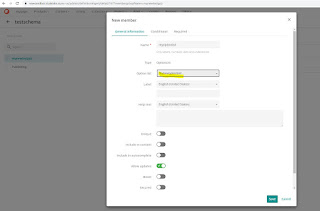
12. Now is the time to create a member group and define members of type string, option list, taxonomy and check conditionals and security:
13. Let's add new members:
14. String type member first:
Secured toggle can be switched on in case if this must be accessible by only selected user group
15. In the conditional tab, the drop down gets populated for option lists and taxonomy present for this schema:
Also note that this field can be made mandatory by toggling the required toggle along with any conditions based on other properties in this schema:
16. Next step is to bring in the taxonomy and option list created early on and use it against this string field.
So, create a separate field of type option list and select the option list created early-on:
Select the required toggle for this field and save.
17. Now, go back to the string property and check the conditional drop down and the option list field must be visible now:
18. Now, set a condition as to when this field should be visible and save:
19. Once changes are applied, can click on show entities to see list of entities following this new schema:
20. Blank list of entities for the new schema:
21. Click the New Entity plus button above the blank list to check the entity associated with the schema. You should be presented with the entity detail page:
So, when you create an entity, the detail page must be automatically created.
22. Next, its time to check the conditional set for the string field. So, let's select the sub-item in the option list and see if that action displays the string label and it should:
23. Fill mandatory fields with some values and save the entity. Now, back in the list of entities, must be able to see the newly added entity:
From here, you should be able to get to the entity detail page by clicking the View detail link in the row.
24. Next step is to launch this page from the menu. So, need a page for the same. Go to Settings -> Pages:
Create a new page:
- Select page type as detail page
- Definition as testschema
25. My test page is present:
26. In the Info tab, there are options to make a menu item appear for this page as well as making this a viewable page. So, ensure to edit both:
27. At this point, if you view the page, it must be blank:
28. Next step is to add an entity detail component:
29. Toggle visibility and add the component to the page:
30. The entity details component must be visible like this in the page:
31. Clicking the component should display the entity details as follows, ensure all left side toggles are switched on:
32. Now, view page and the fields must be visible, select the sub-item in the option list to see the string field appearing:
Also, this page is accessible from a menu item.
33. Saving values must result as follows:
34. Go back to the entity list to check the new value:
So, a couple of takeaways:
1. An entity detail page is the layout where page components are added
2. An entity detail component must be added to entity detail page in order to display the members/fields
3. Both member groups as well as members can be secured


Comments
Post a Comment