Last year, I wrote a Sitecore patch file generator to create Sitecore patch files on-the-fly as well as some template code for the Sitecore event handler. Recently, I wanted to generate a patch file for item:saved event. Here is the scenario behind this:
The javascript code on our web pages is static in terms of configurations, for instance, if you use a javascript-based file upload control, the javascript will have a limit on no. of files you can upload, the total size you can upload etc. What if you want to give the user/content editor the power to configure these things. One of the ways to do this is, pass all inputs as content after parametrizing the Javascript function then assigning those params content dynamically from the model in the cshtml file. The other way is, let the content editor add the values through the CMS (similar to the first) and as a developer you can generate the javascript dynamically with the content values and use that new script (field) in the page. This exactly is the scenario for this item:saved event handler patch and related work. There is only a minor difference between the two methods, all that depends is where are you happy to toss the code although the first is more conventional! I'm going to cover the unconventional route here though!
Now, over to the steps involved for the second approach:
First, generate the event handler using my Sitecore patch file generator :
.\SitecoreEventHandlerGenerator.exe "C:\\Users\\conta\\source\\repos\\sitecoremymvc\\sitecoremymvc\\" "SitecoreMyMvc" "SaveMyItem" "MyEventHandlers" "App_Config\\Include\\" "item:saved"
Auto-generated code:
Code in the event handler:
For a dry run as well as for the sake of continuity with my previous blog, I added the following code for the second field to reflect changes based on first one:
if (item?.Database?.Name?.ToLower() == "master") {
item.Editing.BeginEdit();
item.Fields["Description"].Value = item.Fields["Heading"].Value + "\r" + item.Fields["Heading"].Value + "\r" + "my desc";
item.Editing.EndEdit();
item.Editing.AcceptChanges();
}
Now, let us use this in a realistic scenario. I want to display a Javascript-based timer in my index page I built in my previous blog
I'm going to use the w3schools timer example
If I were to implement this in Sitecore, I will just add the block to the index.cshtml or I can add a field in the template and spit the content of the field from the page. Let us take the second approach of adding the script field to the template:
Added a new field to my Sitecore mysample template:
In the content, added the actual script:
The script field must be added to the C# model:
Allow this field to spit content from the cshtml:
Ensure to use the @Html.Raw along with the multi-line text field else, the browser will work overtime by doing an html encode and will convert " to " and your script won't run in the browser!
Most importantly, as part of plumbing, don't forget to pass data to view in the controller:

Publish all - VS code and Sitecore items. Then, reload the mysample page to see the end-result:
Now, we don't want to stop this here since we are Sitecore Developers. We always want to give more power to content editors. So, instead of having a countdown for 2022, we want this countdown to work forever and the content editor must decide that. Then, on item save, we will pick the value entered by the editor and build our script. Note that there might be better/optimal ways of doing this but, this is one of the ways to show how you can make your Javascript dynamic providing more power to content editors!
So, let us create single line text field in Sitecore for the target date time stamp and add C# property.
Then, this code does the job of building the script:
private string BuldJavascript(string targetDateTime)
{
string str = string.Empty;
str += "<script>\r";
str += " // Set the date we're counting down to\r";
str += " var countDownDate = new Date(\"" + targetDateTime + "\").getTime();\r\r";
str += " // Update the count down every 1 second\r";
str += " var x = setInterval(function () {\r\r";
str += " // Get today's date and time\r";
str += " var now = new Date().getTime();\r\r";
str += " // Find the distance between now and the count down date\r";
str += " var distance = countDownDate - now;\r\r";
str += " // Time calculations for days, hours, minutes and seconds\r";
str += " var days = Math.floor(distance / (1000 * 60 * 60 * 24));\r";
str += " var hours = Math.floor((distance % (1000 * 60 * 60 * 24)) / (1000 * 60 * 60));\r";
str += " var minutes = Math.floor((distance % (1000 * 60 * 60)) / (1000 * 60));\r";
str += " var seconds = Math.floor((distance % (1000 * 60)) / 1000);\r\r";
str += " // Display the result in the element with id=\"demo\"\r";
str += " document.getElementById(\"demo\").innerHTML = days + \"d \" + hours + \"h \"\r";
str += " + minutes + \"m \" + seconds + \"s \";\r\r";
str += " // If the count down is finished, write some text\r";
str += " if (distance < 0) {\r";
str += " clearInterval(x);\r";
str += " document.getElementById(\"demo\").innerHTML = \"EXPIRED\";\r";
str += " }\r";
str += " }, 1000);\r";
str += " </script>\r";
return str;
}
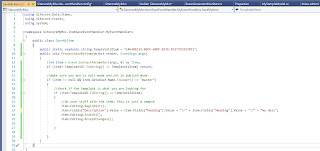
Push the dynamically generated script to the actual Script field:
Now, once you add a new date to the targetdatetime field and save the item, you must be able to see the effect in the script field:
Publish all the changes and view the page to see the effect:
On the outset, there might seem to be a few glitches in terms of pushing content from C# code but then, you can even decide if you really want to build the configured script using just a boolean flag. The whole idea here is more power to content editors by customizing javascript code on-the-fly and this is one of the ways of accomplishing the same. I also like the cleaner cshtml since the content comes from the field.
I also noticed that item:saved event handler slowing down the save process. Maybe this is for another blog article!


Comments
Post a Comment