Extending Sitecore Instance Manager (SIM) - Part 3
What is the context?
SXA is a pre-requisite for Sitecore Commerce Installation. So far, SIM doesn't support installation of SXA-based sites. While Sitecore Install Assistant (SIA) does support the same, SIA doesn't provide the facility to maintain all sites across different versions in a machine within one umbrella. Also, in case of SIA, you don't readily get the option to uninstall sites with the click of a button while SIM has that option.
So, before extending SIM to install Commerce Sites, enabled SIM to build SXA-based sites as a first step.
How does it work?
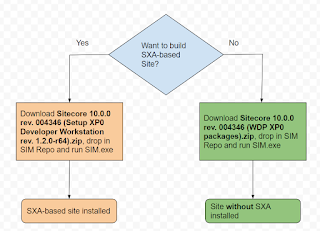
A picture is better than a thousand words!
Just download the necessary zip file from Sitecore and drop under C:\Users\<windows user name>\AppData\Roaming\Sitecore\Sitecore Instance Manager\Repository. Then, run SIM,exe and it takes care of the rest right from the process of unzipping the file.
Detailed Steps:
1. I have multiple versions of web deploy zip files here in my repo:
2. Now, I start my SIM.exe. When I click the "Install Sitecore XP 9 and later" button in the home tab, I get the install dialog:
3. When you click the ".....with SXA" option in the drop down above and provide a relevant site name, press the next button and you will be provided with a list of tasks:
Note that the highlighted SXA task is again added in one of the json files as part of the new changes. The task gets listed only when you select the "......with SXA" option from the drop down in step 1.
The plain Sitecore site will not have the SXA task since each of the drop down items are mapped to different json files. These mappings are the crux of SIM. Each json file with the params is passed onto powershell script for task execution.
4. Click on the Advanced button and you should be able to see the parameters populated by default for the newly added SXA-SingleDeveloper task. These values are passed through the JSON file mapped for this task:
5. Ensure SXA and SPE package paths are populated -
6. Validations must be successful on clicking next button after you close the Advanced settings window above:
7. Click install and here's the newly added SXA task in the bottom of the list:
8. Site uninstall:
9. Changes pushed to the forked repo:
Covered Sitecore 10 XP0 topology so far. Just a matter of mapping in case of other versions.


Comments
Post a Comment