How to export a Sitecore Commerce catalog from a specific environment using ExportCatalogs API with Postman
1. Unzip Sitecore.Commerce.Engine.SDK.4.0.102.zip
2. Once Postman app is installed, click and open Postman -
3. In Postman, click the import button -
4. The SDK has a collection of APIs so the collection should be imported in order to use the APIs.
5. The collection can be imported using Postman, pointing to the folder after clicking import button -
6. Now, select the Devops and Shops folder one after another from the unzipped location -
7. As soon as one of the folder is selected, the listing of API modules is visible and ready for import, so, press the import button -
8. On pressing the import button, if the collection is already imported, you get an alert message asking for a confirmation whether to replace the existing collection. Go ahead and press the greyed "Replace" button since we want to replace the collection in this case -
9. Repeat the same for all alerts and also for both the Devops and Shops folder and the list of APIs will be seen in the left pane of postman now.
10. Now the next crucial step is to import the environments. Click the cog wheel in the top right corner of the window and this opens a dialog with a list of environments and is initially blank -
11. Since we want to import both Adventureworks and Habitat environments, click on the grey "Import" button in the bottom and that opens the choose file dialog. Now select both the files from the file system -
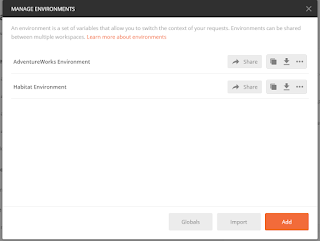
12. On pressing OK button, the two environments are listed in the resulting window -
13. If ever, you change the Adventureworks or habitat environment json files, be sure to use the delete option to get rid of the old environment json and do a re-import of the environment -
14. The dialog can be exited by using the close button on the top and clicking the cog wheel in the top right corner of the window will still display the imported environments. This means the changes are effected.
15. Before invoking the ExportCatalogs API, ensure the timeout is set in IIS and relevant time intervals are set in app pool as stated in Modify IIS related settings
16. Also, switch off SSL Certificate verification -
18. You get the Error: Invalid URI "http:///%7B%7BSitecoreIdServerHost%7D%7D/connect/token" error if the environment is not selected -
19. Select the right environment, in my case, habitat, since i want to export the habitat catalog -
20. Now, all the required variables should be set from the imported environment json. In the environment json, I ensured to point variables to correct urls / ports relevant to what is setup in my machine and now press the Send button after ensuring GetToken Api is selected in the left pane -
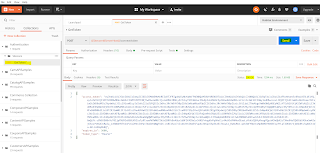
22. So, next step is to export catalog. The ExportCatalogs api is under CatalogAPISamples -> Catalog - API. Check the different tabs to see what is there, the name of exported catalog zip file is visible in the body of the request, press send button:
23. The request, if successful will display a 200 OK response and don't worry about the junk characters in the output. The file can be downloaded by clicking Save to file option in the bottom right of the window -
24. On clicking the save option, the name of the zip file is visible and can be saved in desired location:
25. Traverse to the saved path and open the catalog to see the file list:
Reference:
https://doc.sitecore.com/developers/93/sitecore-experience-commerce/en/walkthrough--exporting-catalog-and-inventory-data.html#UUID-49594c88-c2b9-e1f6-742b-a68874993cbe_section-idm46353697809312
https://davehetal.wordpress.com/2018/11/05/_sitecore-xc-9-0-2-postman-setup/
2. Once Postman app is installed, click and open Postman -
3. In Postman, click the import button -
4. The SDK has a collection of APIs so the collection should be imported in order to use the APIs.
5. The collection can be imported using Postman, pointing to the folder after clicking import button -
6. Now, select the Devops and Shops folder one after another from the unzipped location -
7. As soon as one of the folder is selected, the listing of API modules is visible and ready for import, so, press the import button -
8. On pressing the import button, if the collection is already imported, you get an alert message asking for a confirmation whether to replace the existing collection. Go ahead and press the greyed "Replace" button since we want to replace the collection in this case -
9. Repeat the same for all alerts and also for both the Devops and Shops folder and the list of APIs will be seen in the left pane of postman now.
10. Now the next crucial step is to import the environments. Click the cog wheel in the top right corner of the window and this opens a dialog with a list of environments and is initially blank -
11. Since we want to import both Adventureworks and Habitat environments, click on the grey "Import" button in the bottom and that opens the choose file dialog. Now select both the files from the file system -
12. On pressing OK button, the two environments are listed in the resulting window -
13. If ever, you change the Adventureworks or habitat environment json files, be sure to use the delete option to get rid of the old environment json and do a re-import of the environment -
14. The dialog can be exited by using the close button on the top and clicking the cog wheel in the top right corner of the window will still display the imported environments. This means the changes are effected.
15. Before invoking the ExportCatalogs API, ensure the timeout is set in IIS and relevant time intervals are set in app pool as stated in Modify IIS related settings
16. Also, switch off SSL Certificate verification -
If the above switch is not set to on, you get the following error -
Error: unable to verify the first certificate
17. So, set the switch to off and, hit the GetToken Api.18. You get the Error: Invalid URI "http:///%7B%7BSitecoreIdServerHost%7D%7D/connect/token" error if the environment is not selected -
19. Select the right environment, in my case, habitat, since i want to export the habitat catalog -
20. Now, all the required variables should be set from the imported environment json. In the environment json, I ensured to point variables to correct urls / ports relevant to what is setup in my machine and now press the Send button after ensuring GetToken Api is selected in the left pane -
22. So, next step is to export catalog. The ExportCatalogs api is under CatalogAPISamples -> Catalog - API. Check the different tabs to see what is there, the name of exported catalog zip file is visible in the body of the request, press send button:
23. The request, if successful will display a 200 OK response and don't worry about the junk characters in the output. The file can be downloaded by clicking Save to file option in the bottom right of the window -
24. On clicking the save option, the name of the zip file is visible and can be saved in desired location:
25. Traverse to the saved path and open the catalog to see the file list:
Reference:
https://doc.sitecore.com/developers/93/sitecore-experience-commerce/en/walkthrough--exporting-catalog-and-inventory-data.html#UUID-49594c88-c2b9-e1f6-742b-a68874993cbe_section-idm46353697809312
https://davehetal.wordpress.com/2018/11/05/_sitecore-xc-9-0-2-postman-setup/


Comments
Post a Comment