Sitecore 9.2 Installation with Sitecore Installation Assistant (SIA)
Installation of Sitecore 9.2 was relatively easy with the Sitecore Install Assistant (SIA). The following blogs were useful for my installation process -
https://tothecore.sk/2019/07/22/installing-sitecore-9-2-using-new-sitecore-install-assistant-sia/
http://madhuanbalagan.com/install-sitecore-9-1-quickly-in-5-easy-steps
I however had a couple of hiccups so, decided to document those here. As a first step, I downloaded the Graphical setup package for XP Single from the Sitecore download page.
 Then, unzipped the files -
 Now, open the setup.exe.config file in the above list to confirm the path/URL to Solr -

In the above list, the Solr-related information is the most important part that too in case if you already have another version of Solr running in your machine like mine. In my case, Solr 6.6.2 was already running in 8983 port while this installation expects 7.5.0 to run in the concerned port. This is something I didn't pay enough attention to initially and also, the Solr version I installed was 7.2.1 while the one here in the setup config is pointing to 7.5.0. So, just to highlight these aspects, i decided to write this blog.
Although Sitecore 9.2 runs with solr 7.2.1, for the sake of this blog, i decided to make it run with Solr 7.5.0.
Now, proceeding with the installation process, the first step is to download and setup Solr 7.5.0. The blog about low effort solr installs seems to be quite famous. I downloaded the concerned code from github. Saved it as powershell script (.ps1 file) in my local folder.
The highlighted lines are the ones to be modified based on Solr version, port and JRE version running on your machine.
 Since the goal is to install 7.5.0 version of solr, and since in my case, solr 6.6.2 is already running on port 8983, I've changed those to 7.5.0 and 8984 respectively in my local powershell script. Also, to find the JRE version in your machine, type java in windows 10 Start menu and select "About Java" to find the jre version:
 In case if you have a new machine and don't have JRE, download 64-bit Java for windows from here.
Now, modify and save your local powershell script file based on above values. The modified file is here -
 Ensure to update JRE version in the Install Solr powershell script above to reflect the correct JRE version.
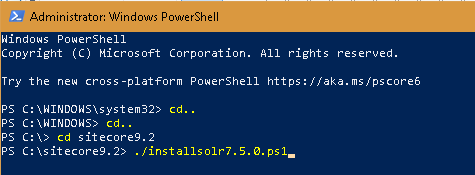
Open windows powershell in administrator mode and traverse to the folder where the above script is saved and run the script to install Solr 7.5.0 -
 This wonderful script downloads solr from the web and installs solr on your machine -
 This may take a few minutes. Ideally, if everything works fine, the solr service must automatically pop in a browser window. In my case, it didn't and i got this error in the powershell window -
Start-Service : Failed to start service 'solr-7.5.0 (solr-7.5.0)'.
At C:\sitecore9.2\InstallSolr7.5.0.ps1:155 char:5
+ Start-Service "$solrName"
+ ~~~~~~~~~~~~~~~~~~~~~~~~~
+ CategoryInfo : OpenError: (System.ServiceProcess.ServiceController:ServiceController) [Start-Service],
ServiceCommandException
+ FullyQualifiedErrorId : StartServiceFailed,Microsoft.PowerShell.Commands.StartServiceCommand

Now, I checked the list of services running in my machine. Since i use a windows 10 machine, i typed services in start menu to get the service list -


Now, solr 7.5.0 is installed and running in my machine. I can also confirm the same by going to the file system to see the folder in the physical directory. If you check the powershell script, this folder location is specified as $installFolder -
 Now, let's re-open the setup.exe.config to cross-check the values are inline with what is expected. Visibly there is difference in what is expected and currently configured in the machine.


Right click the exe and Run as Administrator -


https://tothecore.sk/2019/07/22/installing-sitecore-9-2-using-new-sitecore-install-assistant-sia/
http://madhuanbalagan.com/install-sitecore-9-1-quickly-in-5-easy-steps
I however had a couple of hiccups so, decided to document those here. As a first step, I downloaded the Graphical setup package for XP Single from the Sitecore download page.


Although Sitecore 9.2 runs with solr 7.2.1, for the sake of this blog, i decided to make it run with Solr 7.5.0.
Now, proceeding with the installation process, the first step is to download and setup Solr 7.5.0. The blog about low effort solr installs seems to be quite famous. I downloaded the concerned code from github. Saved it as powershell script (.ps1 file) in my local folder.
The highlighted lines are the ones to be modified based on Solr version, port and JRE version running on your machine.


Now, modify and save your local powershell script file based on above values. The modified file is here -


Start-Service : Failed to start service 'solr-7.5.0 (solr-7.5.0)'.
At C:\sitecore9.2\InstallSolr7.5.0.ps1:155 char:5
+ Start-Service "$solrName"
+ ~~~~~~~~~~~~~~~~~~~~~~~~~
+ CategoryInfo : OpenError: (System.ServiceProcess.ServiceController:ServiceController) [Start-Service],
ServiceCommandException
+ FullyQualifiedErrorId : StartServiceFailed,Microsoft.PowerShell.Commands.StartServiceCommand

Now, I checked the list of services running in my machine. Since i use a windows 10 machine, i typed services in start menu to get the service list -

I could see the solr 7.5.0 service but it was paused. I right clicked on the service to find the Resume option in the context menu. I resumed it to see the service running now -

I could access https://solr:8984/solr/# now -

In case if you still get a blank page as follows, then open the url in a new browser window. In my case, I opened the url in google chrome instead of MS edge.
But, note that the Solr version is 7.2.1 instead of 7.5.0. This is because, if you remember, i had a solr7.2.1 service already installed and running in port 8984, in my machine. So, i went ahead and stopped the concerned (7.2.1) service. I then ensured that my Solr 7.5.0 service is resumed or is in running status -
Note that the solr7.2.1 service is automatically gone from the services list when i stopped. I then switched over to the browser, refreshed the page to find the latest SOLR version getting reflected there -


So, change the above values to reflect the correct ones as shown below. If you are following along and using the same folder structure for solr as me (C:\solr\solr-7.5.0), then the setup.exe.config is here.

Right click the exe and Run as Administrator -

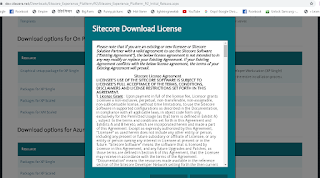
Click on Start. The next screen is about installing prerequisites. Since i already installed the prerequisites in my earlier install, decided to skip the same. In the next screen, i supplied the website prefix, admin password and license file. If an expired license is provided here, then you will get Failed to start service 'Sitecore XConnect Search Indexer error at the end of installation as documented in my blog - Sitecore 9.2 installation errors.

Then, provide SQL Server Settings. Go to SQL Server Management Studio and connect with the credentials you are going to provide here to be sure that the credentials are indeed correct. If the credentials are wrong here, you will get login failed error in the final step as documented in my Sitecore 9.2 Installation Errors using SIA blog.

Next screen is for the solr settings - in my opinion, the most important one in the installation process. Can't stress enough since if you mis-configure values here, you will run in circles like me. The values here must match the ones we configured for solr in the machine.

Provide the configured solr settings here. The values appearing here are picked from setup.exe.config. For now, let us manually change these values to the correct, configured values.

Check the summary page in the next screen and double-ensure all the values are correct.

Good to see that the SIA validates the provided values but, if you traverse back and provide a non-existent value for solr directory, it wouldn't detect the same. So, this affirms the fact that solr values must be cross-checked and correctly provided by us.

Now, click install. The best part about the final screen is, it provides a status and link to the log file.

Click on the log link to see the details of the progress.

The installation will take about 20 minutes (8 GB RAM machine) and some tasks might take too long a time compared to others. Then, finally you should see the success message -

Now, open inetmgr and right click, browse the installed site.

Check my Sitecore 9.2 Installation Errors using SIA for list of installation errors i faced and resolutions.


Comments
Post a Comment