Create Item Package using Sitecore CLI 3.0.0 Serialize Plugin to reuse CSS Class Options for Sitecore 10.1 Forms
In this step-by-step tutorial, I will create an itempackage from one Sitecore 10.1 instance and install the same in another instance in order to reuse the CSS styles in Sitecore Forms autocomplete feature.
I already have a Sitecore package here. Note that this is a Sitecore package that you create and install through the Desktop with the help of the Package designer / Installation Wizard and this is different from content item package that has an extension of .itempackage. I initially thought the Sitecore custom module package, which is a zip is same as Item package with an extension of .itempackage (until I saw the difference in the extension!). If you are like me so far, then you must have understood now that they are not the same!
This is what the Sitecore package contains:

In order to create a serialized item package, the content must be serialized first. In order to serialize items in Sitecore 10.1, you need to install Sitecore CLI 3.0.0 both in the Sitecore Instance as well as in the folder where the Serialized items will be pulled from the Sitecore Instance.
In order to pull the Serialized items from the Sitecore instance, this blog of mine covers the details. But, here are the steps involved:
1. Create a local folder c:\scstest
2. Open PS in admin mode, traverse to this folder and execute dotnet new tool-manifest
3. If dotnet command used above is not recognized , install .net core first and then you will be able to see the dotnet folder under C:\Program Files\
4. Execute dotnet new tool-manifest
5. Install Sitecore CLI 3.0.0 locally in c:\scstest folder by executing: dotnet tool install Sitecore.CLI --add-source https://sitecore.myget.org/F/sc-packages/api/v3/index.json
6. Execute dotnet sitecore init
7. Now, let's connect to the Sitecore Instance from where we want to pull the content, in my case, it is https://sc101latsc.dev.local/
So, the command goes like this: dotnet sitecore login --authority https://sc101latidentityserver.dev.local --cm https://sc101latsc.dev.local --allow-write true
Note that this is interactive login so, you will have to enter your credentials manually and this info is stored in user.json file. So, don't checkin the user.json file!
Also, ensure to prefix the urls with https else, you won't be able to pull serialized items or, won't be able to interact with the Sitecore instance later and you will get a graphQL service not available error in the CLI.
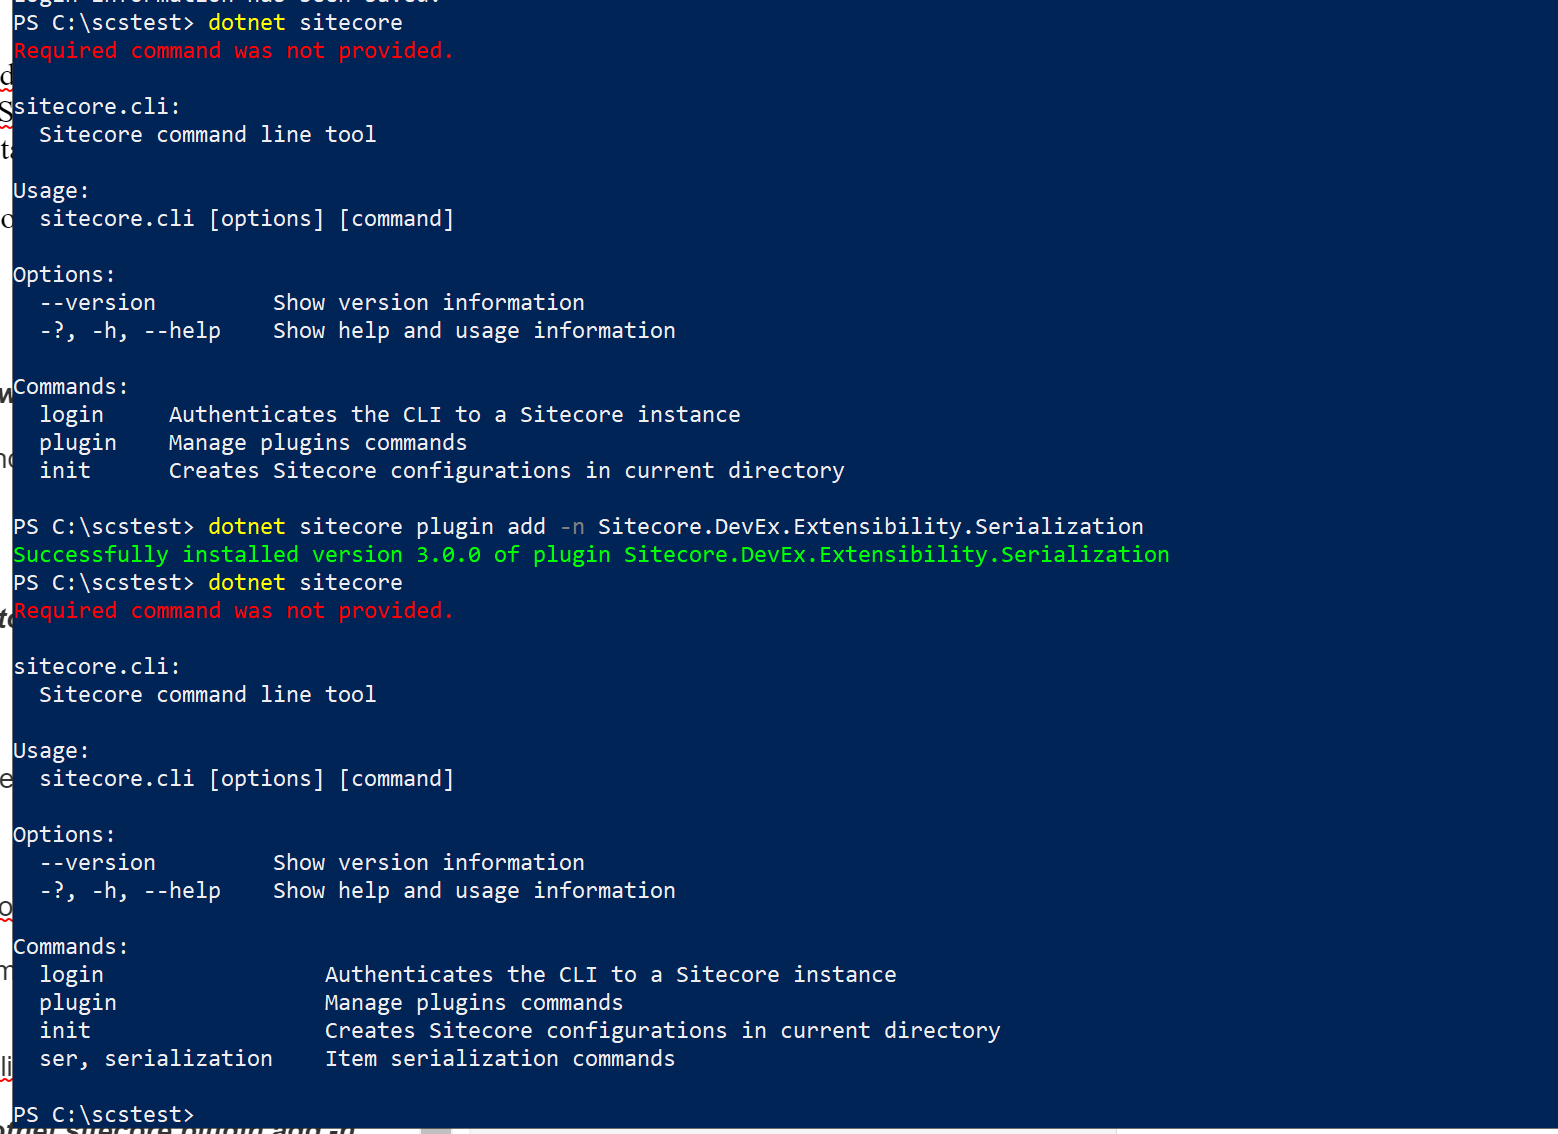
8. Let's install the serialization plugin using the following command: dotnet sitecore plugin add -n Sitecore.DevEx.Extensibility.Serialization
Only after you install this plugin, you can see the ser related commands:
9. Next, we intend to serialize and pull items from the Sitecore Content tree: let's first prepare the sitecore.json by stating what part of the content tree must be serialized. This is how my sitecore.json looks:
{
"$schema": "./.sitecore/schemas/RootConfigurationFile.schema.json",
"modules": [
"./content/content.module.json"
],
"plugins": [
"Sitecore.DevEx.Extensibility.Serialization@3.0.0"
],
"serialization": {
"defaultMaxRelativeItemPathLength": 100,
"defaultModuleRelativeSerializationPath": "serialization"
}
}

Be careful to provide the correct path to the module json in the above sitecore.json file. If you don't provide the correct path, the serialize command will still execute without throwing any errors!
10. Note that content.module.json is a name I chose since I'm serializing content items. Note that the includes section must be manually added to provide paths to items to be serialized:
{
"namespace": "Content",
"references": "",
"items": {
"includes": [
{
"name": "cssclassoptions",
"path": "/sitecore/system/Settings/Forms/Meta Data/CSS Class Options",
"allowedPushOperations": "createUpdateAndDelete",
"scope": "itemAndDescendants"
},
{
"name": "fieldtypes",
"path": "/sitecore/system/Settings/Forms/Field Types/Structure",
"allowedPushOperations": "createUpdateAndDelete",
"scope": "itemAndDescendants"
}
]
}
}
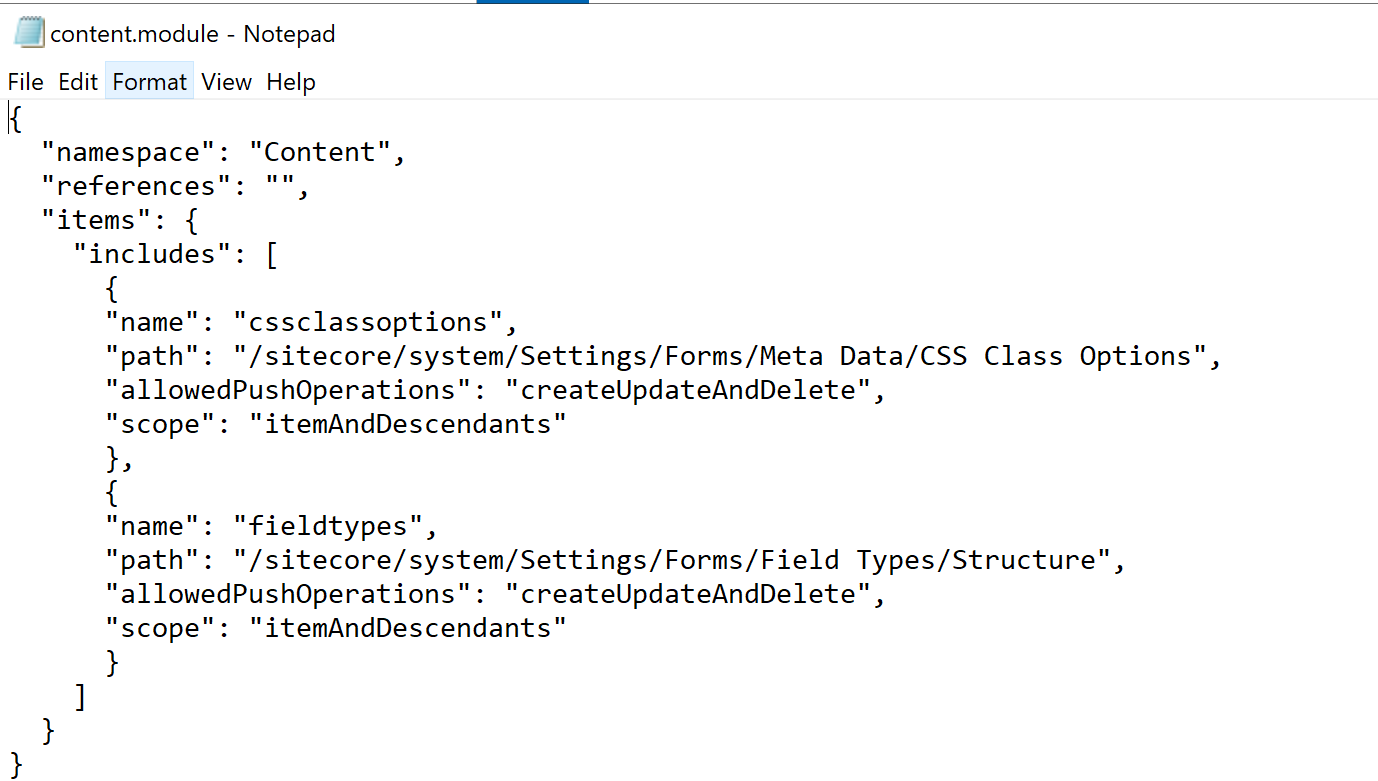
Since I just want two parts of the tree to be serialized, I have added those in the includes section.
11. Don't forget to install the Sitecore CLI 3.0.0 package onto the Sitecore instance from where you plan to serialize content items. In my case, the instance name is https://sc101latsc.dev.local
Without the Sitecore CLI 3.0.0 package, graphQL service wouldn't be available and without graphQL Service, serialization can't happen!
12. Now, back in PS - c:\scstest, if you do a dotnet sitecore ser pull, you must see the serialization happening:

13. You can see the files in the corresponding folder:


Comments
Post a Comment